Smoked and Stealth Corners...Tons o Pics...
 4/17/08, 07:15 PM
#1
Mach 1 Member
Thread Starter

Smoked and Stealth Corners...Tons o Pics...
So, many of us have already done the front and or rear clear corner mod. But it seems as though this subject comes up fairly regularly, so since I was already in the process of doing mine for the second time, I thought I would put together a quick how to for this popular mod. Hopefully it will help someone in the near future....
As I said, this is the second time I have done this mod on my car. The first time I swapped the front corner lenses, the vendor (who will remain nameless) shipped me the clears with the built in orange reflector. This was back in the day when there was a bunch of fuss about legality, DOT regulations, yada, yada, yada....Anyway, not wanting to pay a rather hefty re-stocking fee, I went ahead and installed em. They are not bad, but just did not work with my car.....Anyway.....
Before.....
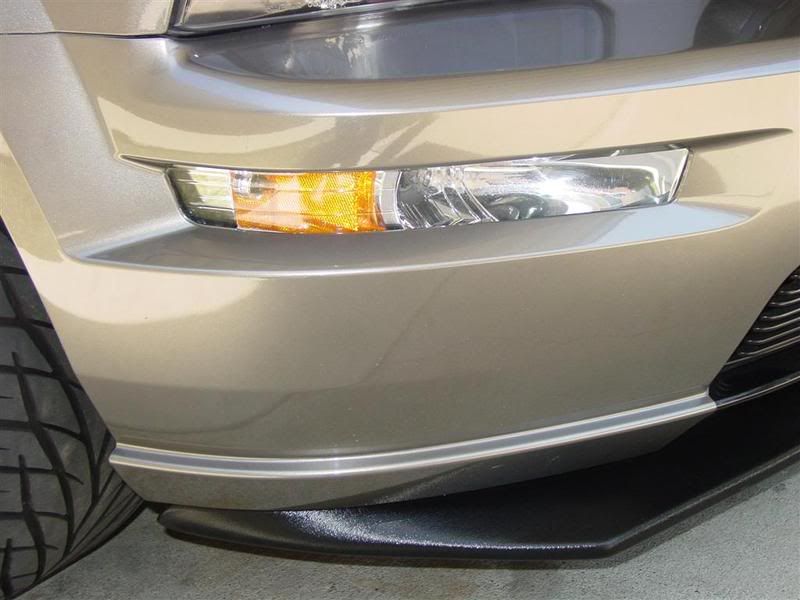
For those that have never done this mod, the first thing you will think is that the vendor has shipped you the wrong lens. They probably have not done so. The lens looks quite large, in comparison to the exposed area of lens you will end up with...

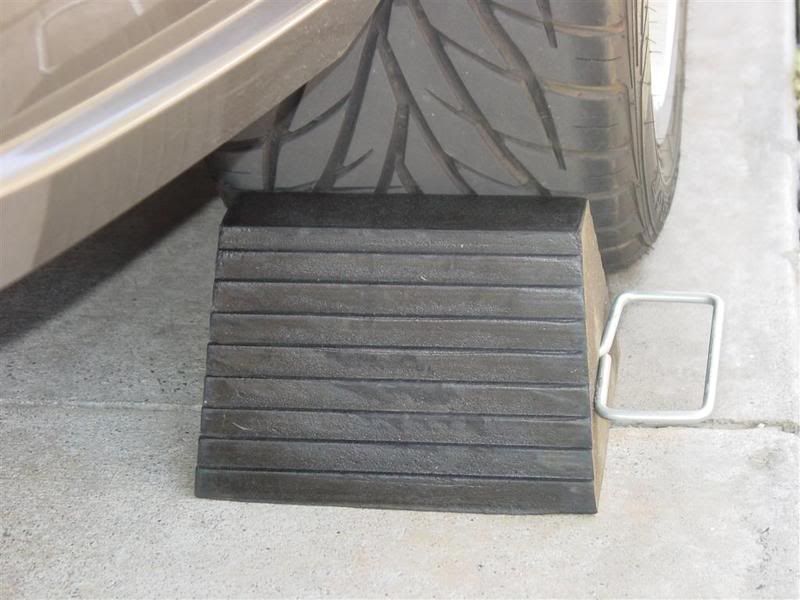
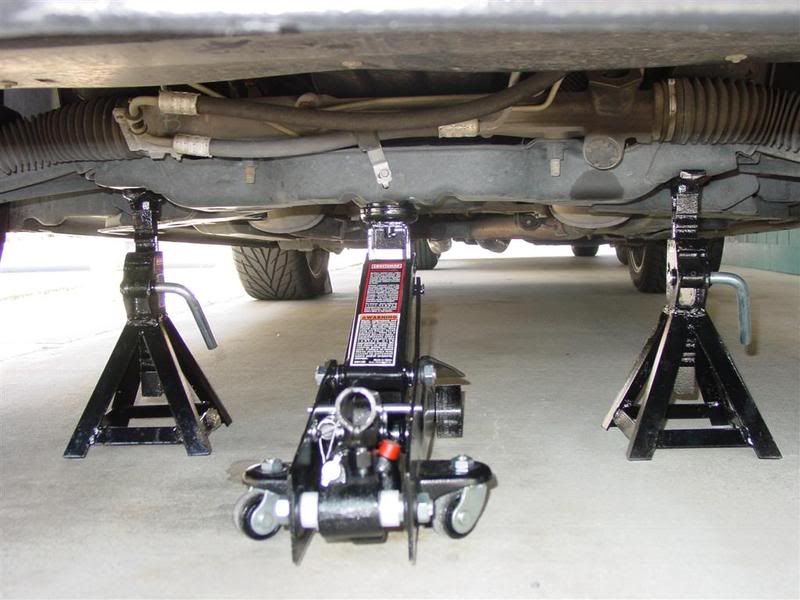
There are several methods people have used to complete this mod. You can access the lens from under the front fascia, you can peel back the fender liner to access it, and I have even heard of some folks accessing the lens from above....I prefer to use a combination of the under the fascia, peel the fender liner method. As with any mod that involves being under the car, SAFETY FIRST!! Take a few minutes to do the job safely, so you will be able to step back and enjoy your work when you are done.
Wheel Chock in place....
Jack and jackstands as well.....
From under the front fascia, this is the lens that is the target of your mod. Again, it is easily accessable from just under the front of the car....
On the outboard side of the lens, there are two winged white pins, as well as a solid guidepin in the middle.....
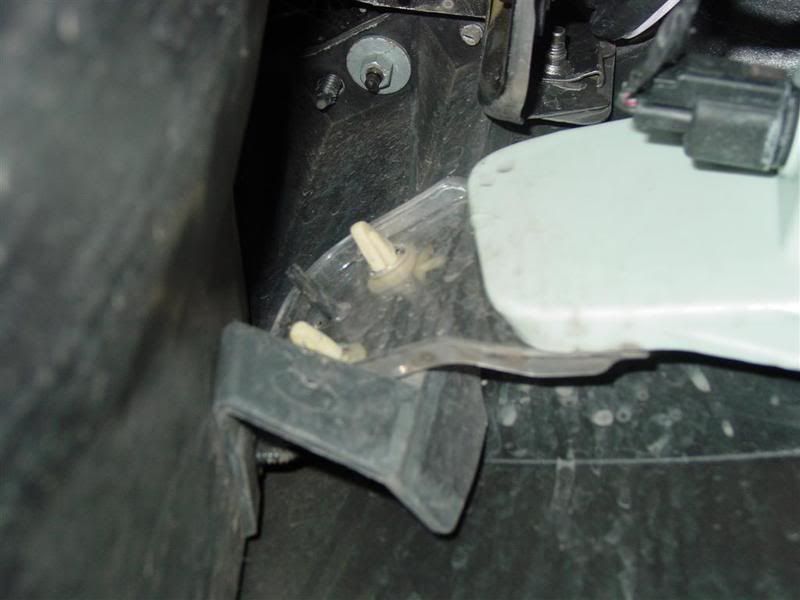
On the inboard side of the lens, there is a tab on the lens, that slides into a slot on the front fascia....

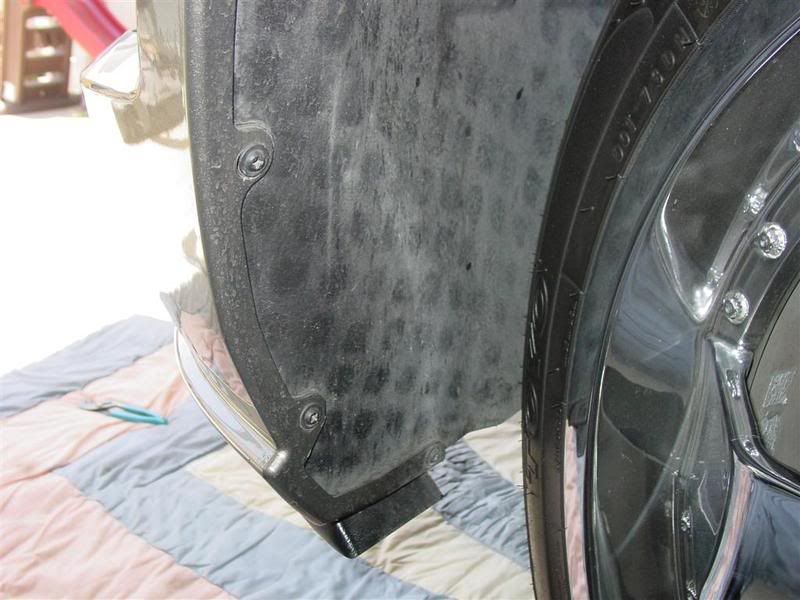
This is where I use the combo, under the front fascia, peel the fenderwell back method. Crank your wheels toward the opposite side of the car that you are working on. Remove the three fender liner screws you can see in this picture...
By peeling back the fender liner, it will expose the corner lens that you are replacing. This will allow the lens to slide to the outboard side of the car, and also give you additional access to the two winged pins that actually hold the lens in place. Just compress the two winged pins, and push in on the front of the lens from the front of the car. The two wing pins will easily release.
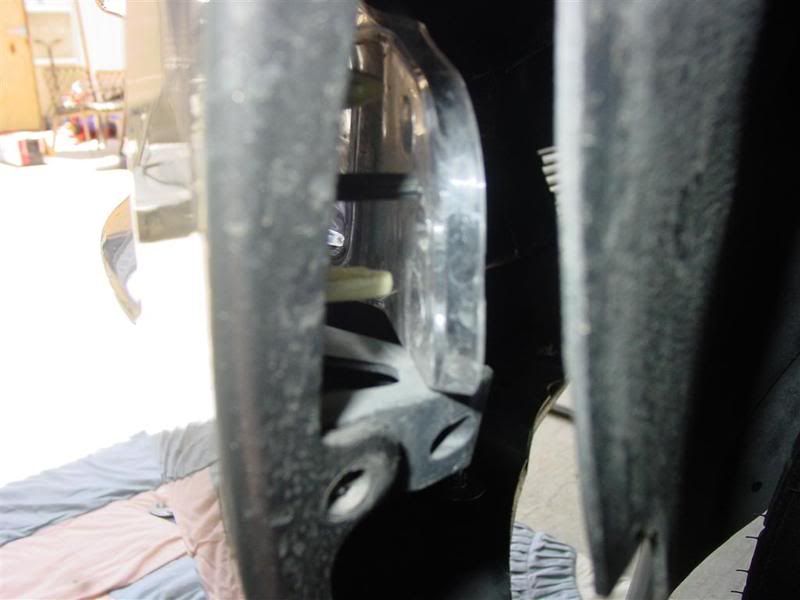
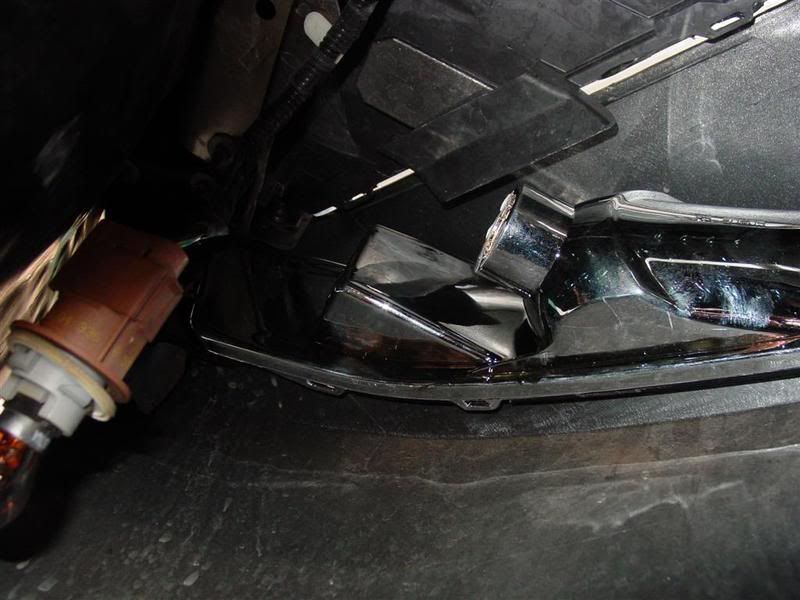
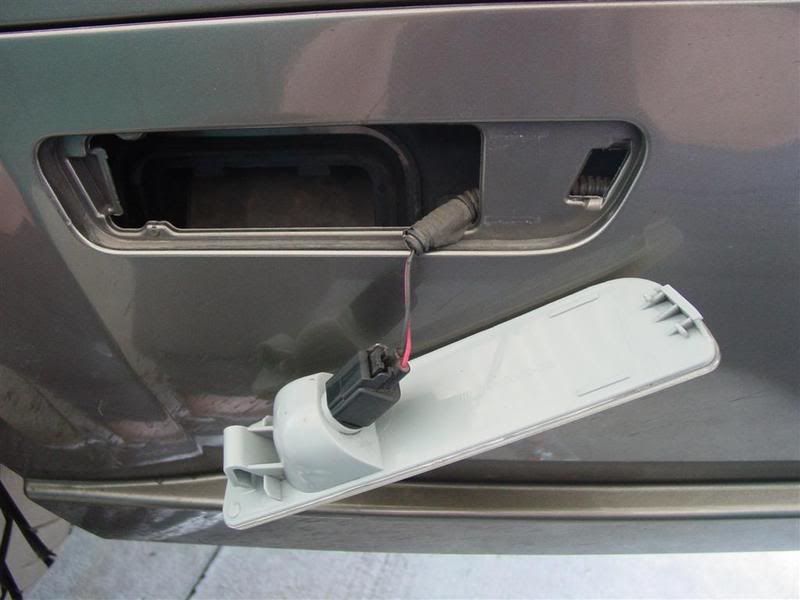
Back under the front fascia, the lens can now be slid toward the outboard side of the car, which then allows the lens to basically just fall down, with the light sockets still attached to the lense. This is the drivers side. The passenger side is a bit tighter, due to the windshield washer resevoir being right in the way. But it is still quite workable...
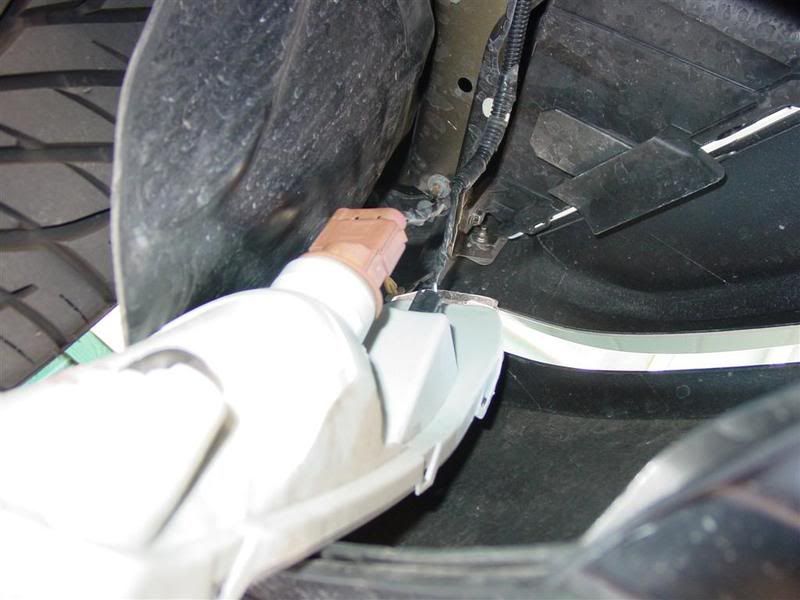
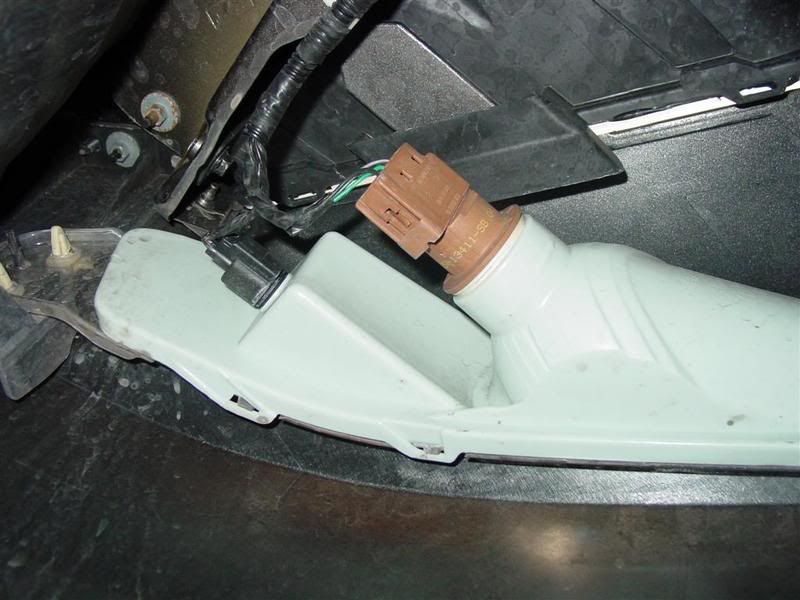
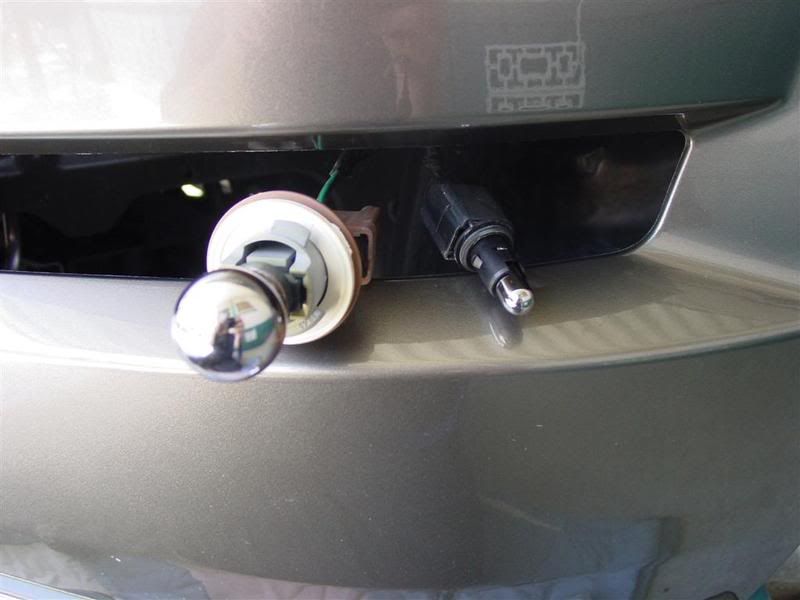
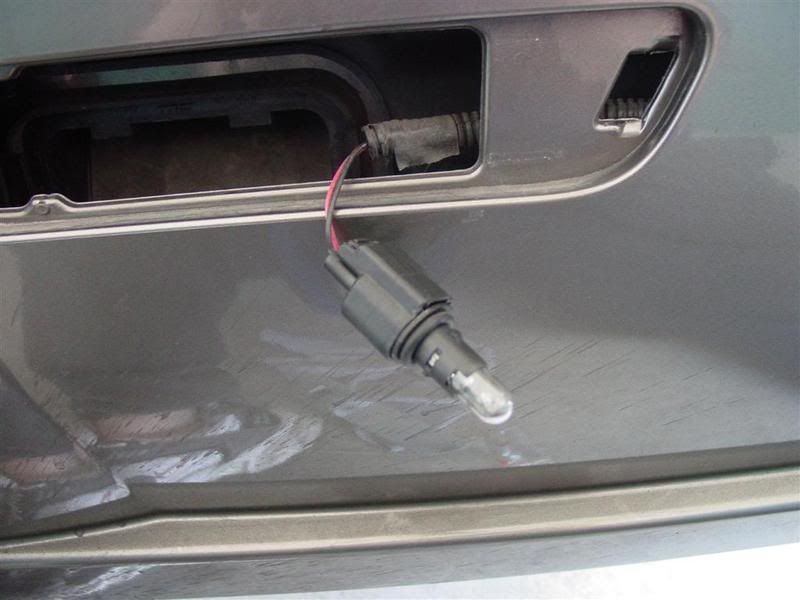
Once the light sockets are twisted and released from the lens, the lens can be removed. At this point, I fed the two light sockets back through the opening in the front fascia for the lens, for ease of bulb replacement.

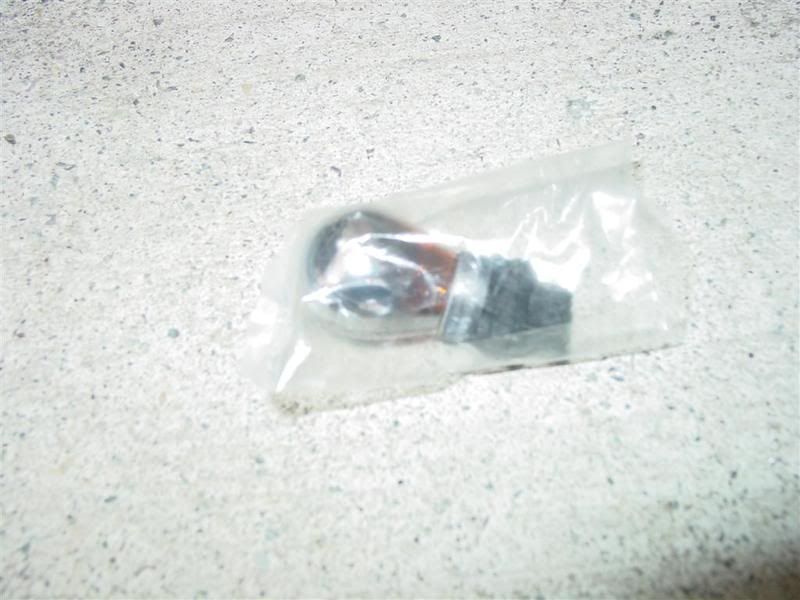
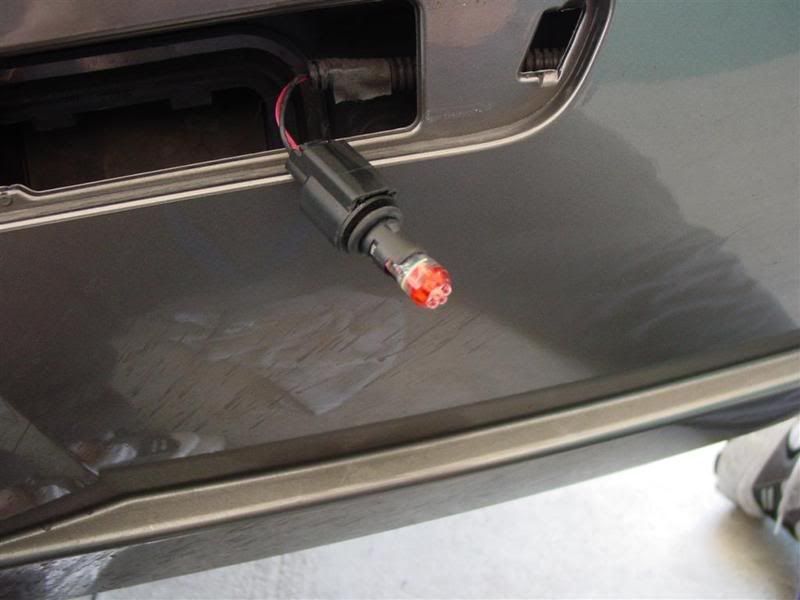
Prior to this, I had used the stock clear bulbs. I opted to change out the bulbs at the same time as the lens replacement, in favor of the stealth bulbs. The bulbs were shipped with the lenses, in these cute little plastic bags. I would suggest leaving the bulbs inside the plastic bags during replacement, to avoid unnecessary handling of the stealth bulbs...
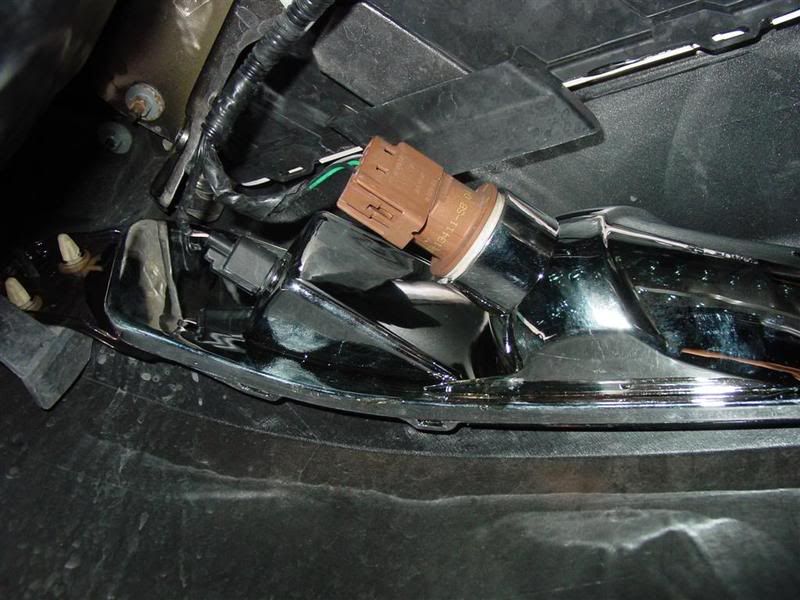
Once the bulb replacement is complete, just push the sockets back through the bumper opening. Back under the car, the tabbed end of the new lens needs to be inserted under the slotted piece of the front fascia. You will probably need to apply a bit of force to get the tab to lock under the slot. Then pivot the lens over the two winged pins on the other side. Both the tabbed side, and the winged side will lock in with a very distinctive snap. You will know when they are propery engaged...
Once the lens is now locked into place, re-install the twist lock light sockets into the new lens... First side is now complete....
Repeat the above process on the passenger side of the car. Again, a bit more of a challenge on the passenger side, due to the washer resevoir. But still fairly quick and easy.
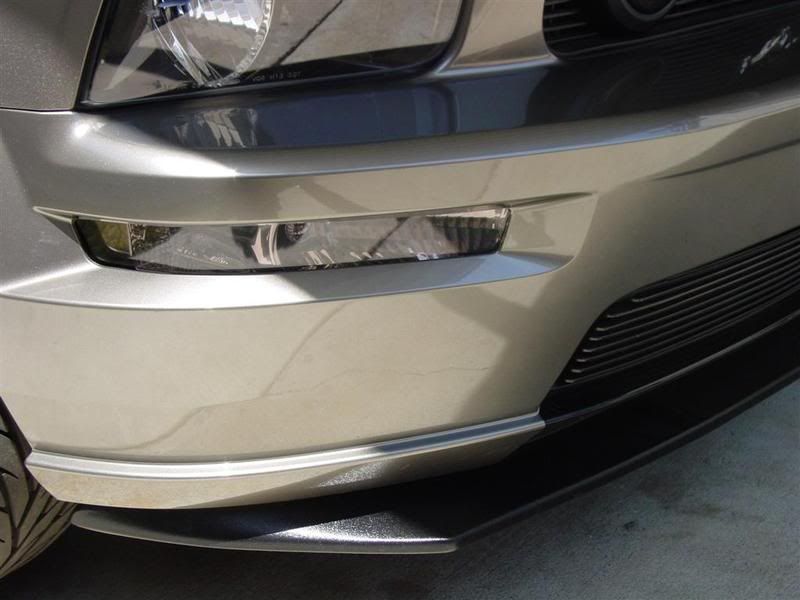
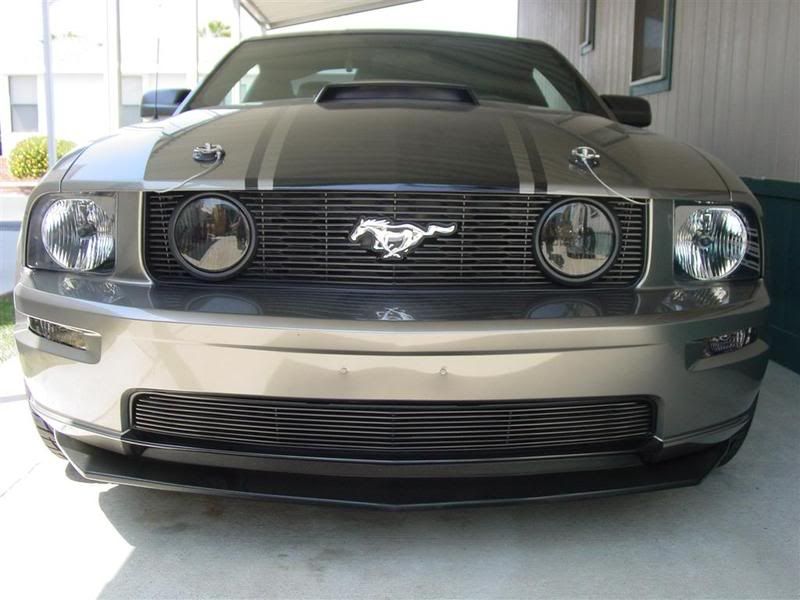
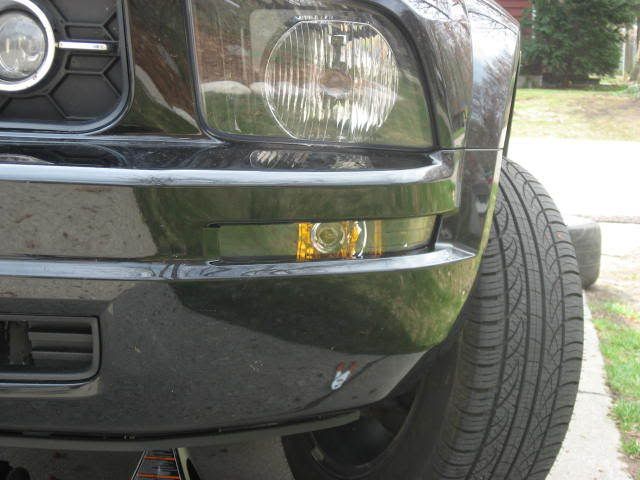
And here are the after pics.......
One of the other mods that seems to go hand in hand with the clear / smoked front corners, is the clear rears. I already had the clear rears on my car, but opted to order the red LED bulbs at the same time as working on the front. Up till now, I had used the clear stock bulbs, but did not really care for the look. That, plus the fact that I really don't need the local police to have another reason to stop and chat.....
The removal of the rear lens is very easy. Use a small flat bladed screwdriver. Make sure you wrap the blade of the screwdriver with a rag or towel, to protect your paint and lens...Then, just insert the blade of the screwdriver at the REAR of the lens.....
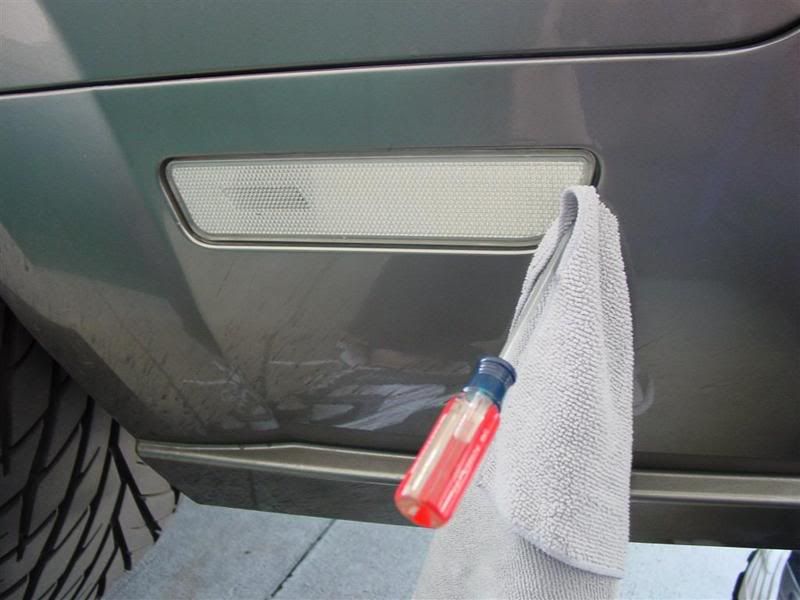
Now pivot the screwdriver toward the REAR of the car. The lens will basically pop right out at you....
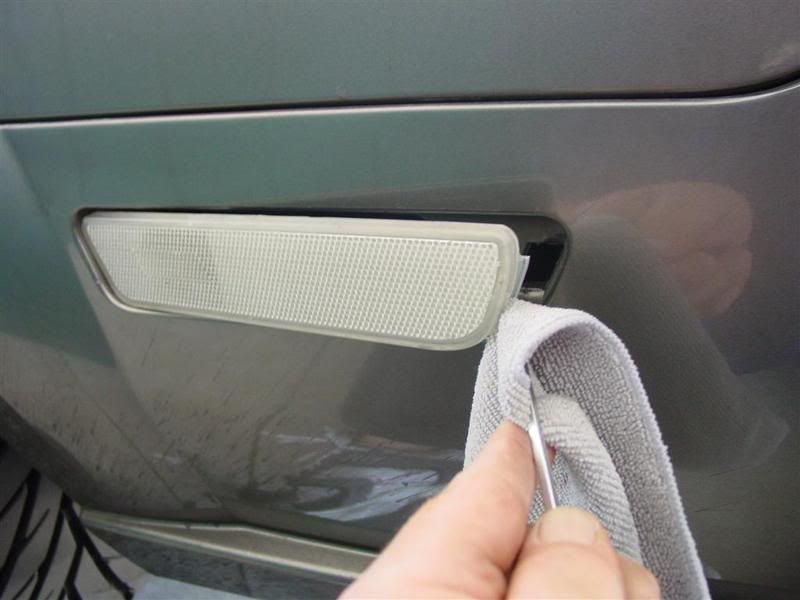
Once the lens pops out at you, just remove the twist lock light socket
As I said earlier, I opted to replace the stock bulb with the red LED bulbs purchased at the same time as the front bulbs and lenses. Reverse this process to re-install the rear lens. Front and rear lens and bulb replacement is now complete.....
I apologize for the filth on the car in the pics. She needs to be washed this weekend, and the wind has been blowing on and off all week.
I hope this helps someone in the near future that is thinking about this mod. In my opinion, fairly easy mod with very nice results......
Mike
As I said, this is the second time I have done this mod on my car. The first time I swapped the front corner lenses, the vendor (who will remain nameless) shipped me the clears with the built in orange reflector. This was back in the day when there was a bunch of fuss about legality, DOT regulations, yada, yada, yada....Anyway, not wanting to pay a rather hefty re-stocking fee, I went ahead and installed em. They are not bad, but just did not work with my car.....Anyway.....
Before.....
For those that have never done this mod, the first thing you will think is that the vendor has shipped you the wrong lens. They probably have not done so. The lens looks quite large, in comparison to the exposed area of lens you will end up with...
There are several methods people have used to complete this mod. You can access the lens from under the front fascia, you can peel back the fender liner to access it, and I have even heard of some folks accessing the lens from above....I prefer to use a combination of the under the fascia, peel the fender liner method. As with any mod that involves being under the car, SAFETY FIRST!! Take a few minutes to do the job safely, so you will be able to step back and enjoy your work when you are done.
Wheel Chock in place....
Jack and jackstands as well.....
From under the front fascia, this is the lens that is the target of your mod. Again, it is easily accessable from just under the front of the car....
On the outboard side of the lens, there are two winged white pins, as well as a solid guidepin in the middle.....
On the inboard side of the lens, there is a tab on the lens, that slides into a slot on the front fascia....
This is where I use the combo, under the front fascia, peel the fenderwell back method. Crank your wheels toward the opposite side of the car that you are working on. Remove the three fender liner screws you can see in this picture...
By peeling back the fender liner, it will expose the corner lens that you are replacing. This will allow the lens to slide to the outboard side of the car, and also give you additional access to the two winged pins that actually hold the lens in place. Just compress the two winged pins, and push in on the front of the lens from the front of the car. The two wing pins will easily release.
Back under the front fascia, the lens can now be slid toward the outboard side of the car, which then allows the lens to basically just fall down, with the light sockets still attached to the lense. This is the drivers side. The passenger side is a bit tighter, due to the windshield washer resevoir being right in the way. But it is still quite workable...
Once the light sockets are twisted and released from the lens, the lens can be removed. At this point, I fed the two light sockets back through the opening in the front fascia for the lens, for ease of bulb replacement.
Prior to this, I had used the stock clear bulbs. I opted to change out the bulbs at the same time as the lens replacement, in favor of the stealth bulbs. The bulbs were shipped with the lenses, in these cute little plastic bags. I would suggest leaving the bulbs inside the plastic bags during replacement, to avoid unnecessary handling of the stealth bulbs...
Once the bulb replacement is complete, just push the sockets back through the bumper opening. Back under the car, the tabbed end of the new lens needs to be inserted under the slotted piece of the front fascia. You will probably need to apply a bit of force to get the tab to lock under the slot. Then pivot the lens over the two winged pins on the other side. Both the tabbed side, and the winged side will lock in with a very distinctive snap. You will know when they are propery engaged...
Once the lens is now locked into place, re-install the twist lock light sockets into the new lens... First side is now complete....
Repeat the above process on the passenger side of the car. Again, a bit more of a challenge on the passenger side, due to the washer resevoir. But still fairly quick and easy.
And here are the after pics.......
One of the other mods that seems to go hand in hand with the clear / smoked front corners, is the clear rears. I already had the clear rears on my car, but opted to order the red LED bulbs at the same time as working on the front. Up till now, I had used the clear stock bulbs, but did not really care for the look. That, plus the fact that I really don't need the local police to have another reason to stop and chat.....
The removal of the rear lens is very easy. Use a small flat bladed screwdriver. Make sure you wrap the blade of the screwdriver with a rag or towel, to protect your paint and lens...Then, just insert the blade of the screwdriver at the REAR of the lens.....
Now pivot the screwdriver toward the REAR of the car. The lens will basically pop right out at you....
Once the lens pops out at you, just remove the twist lock light socket
As I said earlier, I opted to replace the stock bulb with the red LED bulbs purchased at the same time as the front bulbs and lenses. Reverse this process to re-install the rear lens. Front and rear lens and bulb replacement is now complete.....
I apologize for the filth on the car in the pics. She needs to be washed this weekend, and the wind has been blowing on and off all week.
I hope this helps someone in the near future that is thinking about this mod. In my opinion, fairly easy mod with very nice results......
Mike

 4/17/08, 07:47 PM
#3
Team Mustang Source
Looks great! The smoked front bumper lights go perfect with the factory headlights. I also have the rear side markers in clear, but I put a 50% tint on them to match the front bumper lights, and used an LED as well:


Last edited by MTAS; 4/17/08 at 07:48 PM.
4/18/08, 05:27 PM
#6
Great -- this is just what I needed. My black front signals come in next week so I bookmarked your write up.
Thanks for the write up and detailed instructions. Yours came out great, nice look.
Thanks for the write up and detailed instructions. Yours came out great, nice look.
4/18/08, 06:09 PM
#7
Mach 1 Member
Thread Starter
Glad to hear it will help out. Gotta pay it forward...
The rear red LED's, I got at StangMods....
I really like the tint on the rear sides. I think I am going to go with that.....
Thanks,
Mike
The rear red LED's, I got at StangMods....
I really like the tint on the rear sides. I think I am going to go with that.....
Thanks,
Mike
4/18/08, 09:33 PM
#9
Shelby GT350 Member
After looking at this I am leaning towards smoked lenses that compliment the blacked out stock headlamp bezels. I don't know why Ford thought that all amber lenses looked the best. There were even preproduction prototypes that used combination clear lenses with amber reflectors.
Anyway, I'll have to see how much spare change I got left and maybe order the smoked ones. They will look great on my white car.
I am constantly pushing back and prioritizing small mods that I want to do. This just pushed the satin aluminum ebrake handle to the bottom of my list... LOL!
4/18/08, 09:44 PM
#11
legacy Tms Member
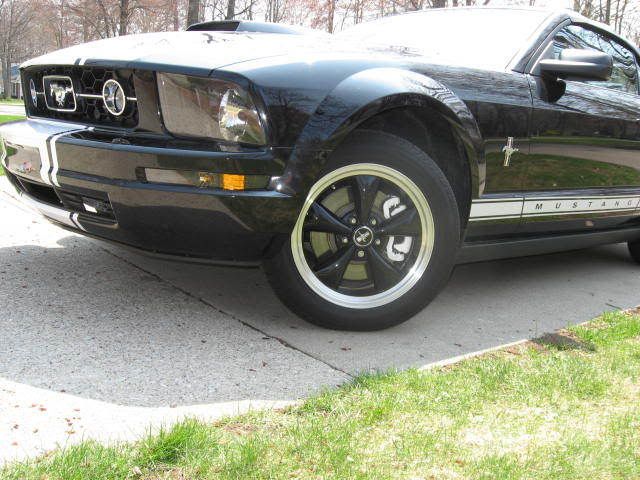
the clears really look great on that color..anyone put a single sequencer on the second bulb yet? think a 'short sequential' up front would be kinda cool...
and MTAS- again, just gotta say love them wheels/tires/stance...that look is still on my wishlist- but a little offroad excursion scheduled frontend mods to come first...got a fang(aeroform.com) shaker (the shakeless one that bolts under the hood instead of to the engins cover- hoping it will leave room for a blower someday- the fang hood is hollow, scoop is still functional as all the ducting is internal- will look just like a shaker till you pop the hood and it lifts up...)
and MTAS- again, just gotta say love them wheels/tires/stance...that look is still on my wishlist- but a little offroad excursion scheduled frontend mods to come first...got a fang(aeroform.com) shaker (the shakeless one that bolts under the hood instead of to the engins cover- hoping it will leave room for a blower someday- the fang hood is hollow, scoop is still functional as all the ducting is internal- will look just like a shaker till you pop the hood and it lifts up...)
4/19/08, 06:21 AM
#12
V6 Member

Join Date: July 5, 2007
Location: Carlisle, PA
Posts: 97
Likes: 0
Received 0 Likes
on
0 Posts
Got Oatz - Thanks for your pics and installation instructions. I have been considering this mod for a while but thought it was a lot tougher. Your post will make it much easier.
4/25/08, 10:58 AM
#15
New front turn signals installed!
Mike, I referred to your write up a couple of times this morning! I'll probably end up getting another set just like you did to get rid of the orange reflector that was on this set.
They weren't quite as dark as I thought from the picture, and I need to get the stealth bulbs still but I think that it is an improvement over the stock "orange bags under the eyes". Install wasn't too bad, getting the fender liner back in place was probably the worst part, and I somehow broke the guide pin taking the first one off.
Before:

After:
Comparison old on left and new on right:

They weren't quite as dark as I thought from the picture, and I need to get the stealth bulbs still but I think that it is an improvement over the stock "orange bags under the eyes". Install wasn't too bad, getting the fender liner back in place was probably the worst part, and I somehow broke the guide pin taking the first one off.
Before:
After:
Comparison old on left and new on right:
4/25/08, 07:53 PM
#17
Mike I gotta complain... Taco Bill would have made sure his car was CLEAN!! CLEAN!! before posting a how-to... you should be ashamed...

...
...
Hahahahaha! Just kidding!!!
...
...
Hahahahaha! Just kidding!!!
4/25/08, 09:56 PM
#18
Mach 1 Member
Thread Starter
 4/25/08, 10:40 PM
#19
Shelby GT350 Member
I have another question. Where did you get your smoked turn lenses from? I see some for sale that have black reflectors and I think I like yours better with the smoked lenses that retain the all chrome reflectors behind it.
4/26/08, 08:39 AM
#20
Member
Join Date: September 25, 2005
Posts: 47
Likes: 0
Received 0 Likes
on
0 Posts
Got Oatz , Thanks for this great post. Ordered everything from Stang Mods Thurs & Fed Ex arrived this morning , but the front (smoked) corners are scratched up across the lenses. Sent Stang Mods a phone msg & e-mail. project on hold til they get back to me ( not bashing , just my luck, service was fast ) AGGGHHHH