Adding the OEM nav
 12/27/12, 10:58 AM
#1
Legacy TMS Member
Thread Starter
Adding the OEM nav
Don't believe what Ford and everyone else says. You absolutely can add the factory nav. Yellow 302 added it to his 2013, and I have just added it to my 2012.
When done, everything will work, but you will not have dual climate zone control, only single, just as you did before.
Here is the write up. I didn't take pics while installing, sorry, but it is straight forward on how to do this.
If your car does not have SYNC, I believe you will need to get the SYNC module as well.
Keep in mind that some navs will be programmed to have the rear view camera and some won't. If you got one without rear camera, but your car has the camera, then you will need to get the dealer to program the nav using the VIN from a car that has nav and camera. I was lucky and didn't have to bother.
If you got a nav with camera, but you don't have camera, there is no issue other than the screen blanking when you go in reverse.
If you have heated seats, you need to get the face panel with heated seat buttons. No programming of the nav needed.
You can use this VIN. It is from a 2010 car that has the nav and the rear view camera.
1ZVBP8FH7A5147529
To enable or disable rear camera, you can contact these guys:
http://www.4dtech.com/
Here is my nav installed:


Last edited by jim010; 8/3/15 at 01:53 PM.
 12/27/12, 11:03 AM
#2
Legacy TMS Member
Thread Starter
First, your list of parts and why you need them:
You must have:
main dash harness ($200 - $300) - you need to check the build date of your car in order to be sure you get the right harness for your car. Part number ranges from AR3Z to CR3Z 14401 with end letters. Mine was CR3Z 14401 KA. Check with your dealer as to which you need. Make sure you state that you need a harness with the nav (and heated seats if you have them).
sun load sensor ($20) - DG9Z 13A018 A. Don't know what this enables, but with the new dash harness, the old sensor won't plug in anymore. The old sensor uses 2 wires, while the new one use 4. It has a driver and passenger sensor in it.
antennae satellite/GPS splitter harness ($30) - AR3Z 10E928 A (this may be on the new harness already)
climate control module ($75) - CR3Z 19980 B.
NAV ACM (the unit itself) - You'll have to get this from a wrecker. Ford won't sell it to you. You'll need to pay attention as to whether the NAV is programmed for rear camera or not. Mine had this, but yours may not and it will need to be programmed. You would need to find a car that had this options and use its VIN.
monitor ($400 - get it from a wrecker with your NAV instead) - CR3Z 10E899 A
center console bezel ($ ? - get it from the wrecker) - Again, check for heated seats.
Not required, but highly recommened. If you decide to get functioning dual zone climate control, you will need to go to Muskoka's post #208 in this thread on page 11. The dash HAS to come out to get the evaporator housing switched.
evaporator housing ($250) - DR3Z-19850 B - if you want to get the dual climate zone functioning. Not necessary as your climate will still work just fine, but the passenger will not have separate control.
actuator motor for blend door ($20) - AR3Z-19E616-A - if you decide that you want functioning dual zone, you will need this motor
climate system harness ($30) - AR3Z 18B574 B. This is to get the temperature buttons to work right, otherwise they will work in reverse - but they will work without this.
right steering wheel switches ($45) - AR3Z-9C888-FA. If you don't get this switch, the 'phone' and 'ok' buttons don't work.
To get sound:
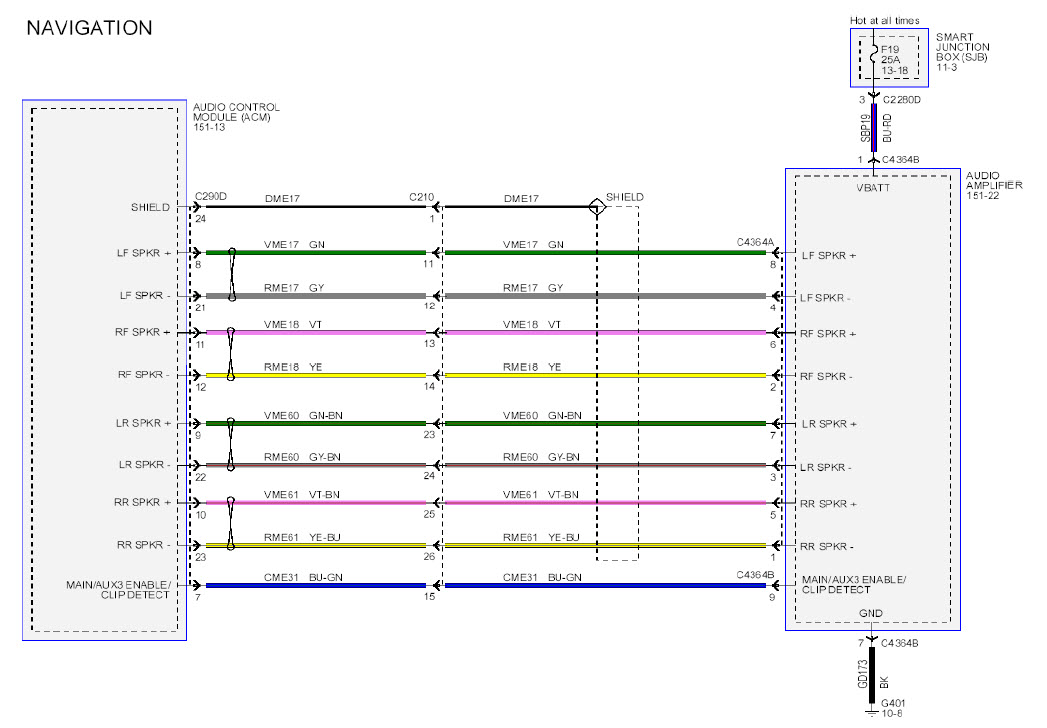
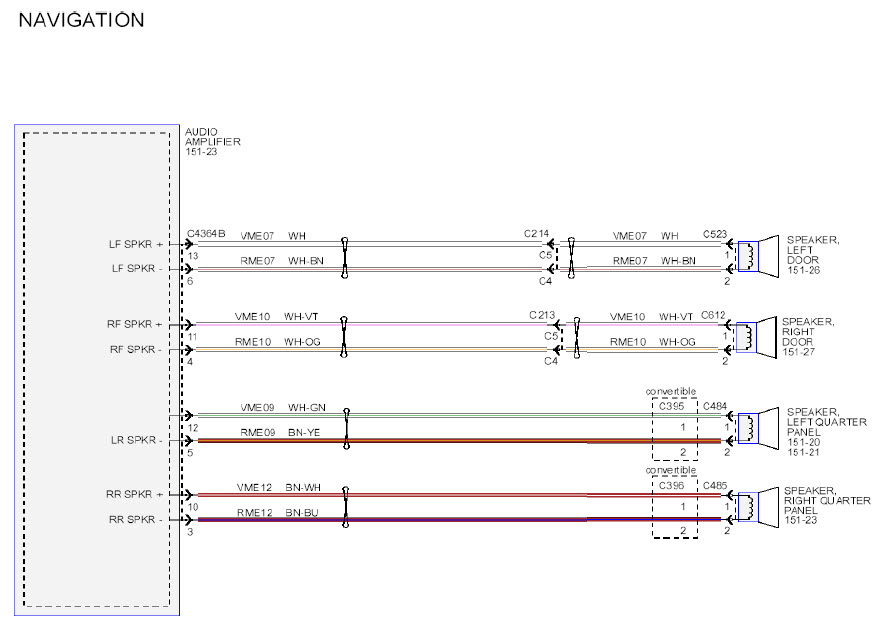
Recommended you get an aftermarket amp and let the stereo guys wire it. If you decide to go OEM with the amp, be aware this is NOT plug and play like the nav. You will be making your own harnesses, tapping into wires and adding pins into connectors. You'll savelot's of money here going OEM, but you'll pay for it with the amount of time needed to wire it up properly:
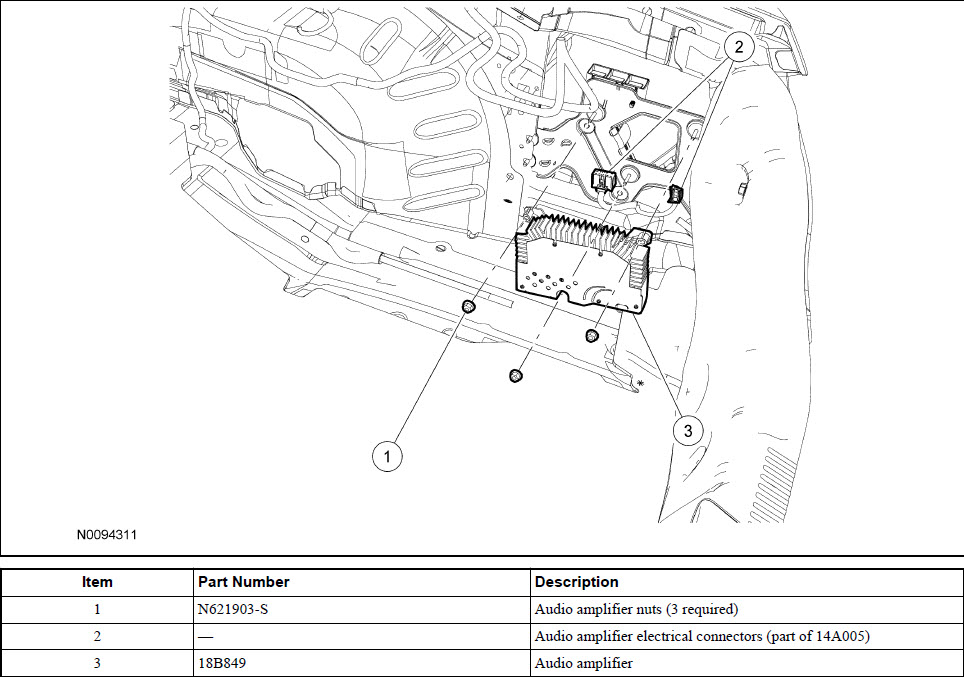
amp ($125) - AR3Z 18B849 C
pigtails for amp ($35) - WPT 955 and WPT 998
bracket for amp ($40) - AR3Z 14536 A
16 guage speaker wire (twist the pairs together)
22 guage stp 4 pair wire (4 pairs of wires that are twisted and shielded with a drain wire)
18 guage wire
1 double size female pin to put into connector 2280D (on the smart junction box)
10 single size male pins to put into connector 210
I just yanked these pins out of some connectors from my old dash harness. Plenty to choose form..
OR
you can just buy the main body harness. You'll have to remove everything, seats, center console, dash, panels - all of it - in order to replace your existing body harness with the new one.
Main body harness ($~400) - CR3Z-14A005-KC - this part number is for an automatic car with the nav, heated seats and rear camera. You will need to check the part number for yourself to ensure that it is correct for your car, just as you had to with the main dash harness.
You must have:
main dash harness ($200 - $300) - you need to check the build date of your car in order to be sure you get the right harness for your car. Part number ranges from AR3Z to CR3Z 14401 with end letters. Mine was CR3Z 14401 KA. Check with your dealer as to which you need. Make sure you state that you need a harness with the nav (and heated seats if you have them).
sun load sensor ($20) - DG9Z 13A018 A. Don't know what this enables, but with the new dash harness, the old sensor won't plug in anymore. The old sensor uses 2 wires, while the new one use 4. It has a driver and passenger sensor in it.
antennae satellite/GPS splitter harness ($30) - AR3Z 10E928 A (this may be on the new harness already)
climate control module ($75) - CR3Z 19980 B.
NAV ACM (the unit itself) - You'll have to get this from a wrecker. Ford won't sell it to you. You'll need to pay attention as to whether the NAV is programmed for rear camera or not. Mine had this, but yours may not and it will need to be programmed. You would need to find a car that had this options and use its VIN.
monitor ($400 - get it from a wrecker with your NAV instead) - CR3Z 10E899 A
center console bezel ($ ? - get it from the wrecker) - Again, check for heated seats.
Not required, but highly recommened. If you decide to get functioning dual zone climate control, you will need to go to Muskoka's post #208 in this thread on page 11. The dash HAS to come out to get the evaporator housing switched.
evaporator housing ($250) - DR3Z-19850 B - if you want to get the dual climate zone functioning. Not necessary as your climate will still work just fine, but the passenger will not have separate control.
actuator motor for blend door ($20) - AR3Z-19E616-A - if you decide that you want functioning dual zone, you will need this motor
climate system harness ($30) - AR3Z 18B574 B. This is to get the temperature buttons to work right, otherwise they will work in reverse - but they will work without this.
right steering wheel switches ($45) - AR3Z-9C888-FA. If you don't get this switch, the 'phone' and 'ok' buttons don't work.
To get sound:
Recommended you get an aftermarket amp and let the stereo guys wire it. If you decide to go OEM with the amp, be aware this is NOT plug and play like the nav. You will be making your own harnesses, tapping into wires and adding pins into connectors. You'll savelot's of money here going OEM, but you'll pay for it with the amount of time needed to wire it up properly:
amp ($125) - AR3Z 18B849 C
pigtails for amp ($35) - WPT 955 and WPT 998
bracket for amp ($40) - AR3Z 14536 A
16 guage speaker wire (twist the pairs together)
22 guage stp 4 pair wire (4 pairs of wires that are twisted and shielded with a drain wire)
18 guage wire
1 double size female pin to put into connector 2280D (on the smart junction box)
10 single size male pins to put into connector 210
I just yanked these pins out of some connectors from my old dash harness. Plenty to choose form..
OR
you can just buy the main body harness. You'll have to remove everything, seats, center console, dash, panels - all of it - in order to replace your existing body harness with the new one.
Main body harness ($~400) - CR3Z-14A005-KC - this part number is for an automatic car with the nav, heated seats and rear camera. You will need to check the part number for yourself to ensure that it is correct for your car, just as you had to with the main dash harness.
Last edited by jim010; 5/11/15 at 04:51 PM.
12/27/12, 11:08 AM
#3
Legacy TMS Member
Thread Starter
Getting the Nav ACM is the trickiest. Ford won't sell it to you, as they think that it can't be retrofitted (they are wrong) because the nav is specific to the car that carries it.
You will need to get it from a wrecker.
I got the NAV ACM, monitor, antannae cable, dash harness (which I couldn't use) and center console bezel for $600 from a wrecker. For everything I needed, I spent ~$1100 on this.
Get as many of the parts from a wrecker as you can. You'll save soo much money. Try here to find a nav in the wreckers:
http://www.car-part.com/
For the other parts if you can't get them from the wreckers, try partscheap.com or Tousley Ford. Shop around if you have to buy a part new. Especially if it is the dash harness you need.
12/27/12, 11:30 AM
#4
Legacy TMS Member
Thread Starter
Once you have all the parts (and be sure you have ALL the parts. You don't want your dash in pieces while you wait for the needed piece to come in.) the first thing you will need to do is take the dash and center console apart.
You can get the dealer to print off the Ford instructions on how to remove them.
Disconnect the battery!
Remove the center console first.
To do this, open the center console door. Pry the console trim up from there. There are no screws holding this down. Keep prying up until the shifter trim pops up a bit. Once there is enough of the shifter trim to grab, pry it off, and then continue to pry off the console trim until you can reach down and unplug the ambient lighting and the traction/hazard switches.
Lift it off.
The center stack screws will be revealed.
Last edited by jim010; 12/27/12 at 11:55 AM.
12/27/12, 11:43 AM
#5
Legacy TMS Member
Thread Starter
To remove the center stack trim, take out the 2 screws at the bottom. Then pry the trim off. There's a plug that needs to be disconnected on the back of the trim.
Now the radio and electronics screen is exposed. Unscrew them, unplug them and take them out.
Above the radio is the black climate module. Unplug it and take it out. It is held in by the metal bracket tabs on each side of it. Press the tabs in using pliers and slide it out.
Now the radio and electronics screen is exposed. Unscrew them, unplug them and take them out.
Above the radio is the black climate module. Unplug it and take it out. It is held in by the metal bracket tabs on each side of it. Press the tabs in using pliers and slide it out.
12/27/12, 11:54 AM
#6
Legacy TMS Member
Thread Starter
Next the dash panels.
First, you will need to take off the door sill trim. It is taped down, so careful prying it off. You just need to lift them up enough so that you can then pull off the kick panels. The driver's side kick panel has a large bolt holding it to the side. Take it out before pulling on it. For the passenger side, take off the fuse box door before pulling. Remove teh kick panels.
eThe guage panel just pops out.
The trim below the guages has screws along the bottom. Take them out, and then lift the trim off. There is a metal bracket underneath that trim that also needs to be removed.
Now take off the trim around the steering wheel off. There are screws that you can take off from underneath. Then pry open gently the trim and remove.
12/27/12, 12:01 PM
#7
Legacy TMS Member
Thread Starter
Remove the glove box next.
You now have access the the airbag and Sync module. I would take off the Sync module to get better access to the airbag, which is held by 2 bolts.
Unplug and push the airbag out and pry the airbag dash trim free from the tabs from the inside.
Now the centre airvents trim is exposed. Remove.
Finally, the side panels on either end of the dash should be removed. Push the tabs out from the inside for these. If you pull them off, you'll break the tabs.
12/27/12, 12:14 PM
#8
Legacy TMS Member
Thread Starter
One of the few pictures I have for you.
The sun sensor in the middle of the defrost vent needs to come out.
I took the entire dash out of the car, but another member managed to do this without removing the dash. Removing the dash made switching out the dash harness soo easy. Otherwise, you will need snake arms to get at some of the really hard to reach areas. Like this one... .
From underneath the dash, push out the tabs for the defrost vent. Once you have enough of them pushed out, you should be able to pull the rest out from above. Take out the sun sensor. Good luck here.
 12/27/12, 12:20 PM
#9
Legacy TMS Member
Thread Starter
For this part, I had the dash pulled out. Made life easier when switching the harness. If you choose not to pull it out, then you better have some pretty flexible arms and a good flashlight.
If you do choose to pull out the dash, you will need to also pull out the rest of the center console, remove the steering wheel and also remove the shifter. If you can, remove the rear view mirror as well. I didn't remove teh shifter or the mirror, and that made pulling out the dash really difficult.
For this, get the instructions for removal from the dealer.
Be really careful pulling out the dash. It is a 2 man job. The plastic is thin and can break easy, so hold the dash on solid parts only.
12/27/12, 12:24 PM
#10
Legacy TMS Member
Thread Starter
Whether the dash is out or you left it in, it is now time to switch the harness.
I would disconnect a couple of plugs, and plug in the new harness as you go. That way you don't lose track of what plug goes where.
The harness is not particularly flexible, by the way, so you will be man-handling it if you left the dash in the car.
Probably the hardest plug to switch out with the dash in the car will be the sun sensor. Good luck.
12/27/12, 12:33 PM
#11
Legacy TMS Member
Thread Starter
Next, you will want to switch out the climate system harness and put in the antannae harness.
With all the harnesses in place, now you can put in the new climate module, the nav, and the screen and plug it all in.
Reassemble the dash, but keep the centre stack trim off.
Everything should work except sound (2013s and up should have sound anyway.). To get sound, here is where you need an amp.
The easiest solution is to get an aftermarket amp. Laserred98 suggests the MS-8 amp.


 12/27/12, 12:39 PM
#14
Legacy TMS Member
Thread Starter
This is form Muskoka. If you are wanting the dual zone, I reposted it here:
Hi
Jim and I have been PMing regarding the nav and dual zone upgrade that my son and I have done in his 2012 Premium Race Red.
We were able to purchase a nav system from a 2011 Shelby GT 500.
We followed Jims directions regarding the necessary components to install for a nav system.
I decided to also install the necessary components to get the dual zone system working as well.
My concern was that, I did not want to drain the coolant, as well as the AC freon and felt that even though Ford only sells the HVAC evaporator box as a complete unit (either single or dual zone) that there must be a way to convert a single zone car to a dual zone without too much difficulty. I was right.
The main difference is the air distribution plenum on the HVAC evaporator box, as well as one control door motor and the wiring harness.
The necessary components to do this conversion is as follows:
DR3Z-19850-B evaporator housing $254.79
AR3Z-18B574-B dual zone wiring harness $27.55
AR3Z-19E616-A Temperature blend door actuator motor $20.30
At this stage I'm assuming that any one who is about to convert from single to double zone will have taken out the dash purchased the components on Jims list and has a visual of the HVAC evaporator housing.
The included photo shows the difference from the single (still installed) and the double (on the transmission hump)
The only difference is that there is an extra temperature blend door actuator motor located on the drivers side of the plenum. When you purchase the evaporator housing using an 8MM socket set remove the self tapping screws holding the blend door housing onto the main evaporator housing. Using some of the removed screws install the new temperature blend door actuator motor onto the end of the drivers side blend door (see photo) .
Next remove the single zone evaporator housing (9 screws)( one is underneath) and remove the two existing blend door actuator motors being careful to install them in the same position on the dual zone plenum ( as they were on the single zone plenum) as they are different motors with different wiring connectors.
Install the dual zone plenum ( 9 screws) ( and two additional for the side housing) install the new wiring harness and when you replace the dash with the nav unit you now have dual zone HVAC controlled by the nav unit.
In the photo the single zone plenum is still installed. You can see on the drivers side of the dual zone the additional temperature blend door motor that we have installed. The whole conversion took us about 1 hour.
I also purchased a Rear spoiler with camera.
AR3Z-6344210-BA $284.31
This was done to have a OEM back up camera. My nephew owns a Maaco store so he painted the spoiler Race Red.
Since the existing 14A005 main wiring harness did not have the wiring for the OEM amp (located in the trunk) or the necessary wiring harness for the spoiler mounted backup camera, I decided to replace the main wiring harness.
CR3Z-14A005-KB $320.61
In order to replace this wiring harness the whole interior of the car has to be removed. This was not a job for the faint of heart . This replacement should only be done by those who have lots of experience with automobile wiring as well as funds to justify the cost. I'm glad that we did it since the wiring of the OEM audio amp in the trunk was a breeze as was the wiring for the Shaker 1000 sub woofer in the trunk and the wiring for the back up camera.
We installed a Lockpic with cameras installed in the license plate lower bolt hole and one on the passenger side mirror.
All in all the whole system works very well.
The only reason that I started on this is that my 21 year old son is very directionally challenged and having the nav unit has allowed him to get around without the distraction of looking at his phone.
If you have any questions I would be pleased to answer to the best of my ability
Last edited by jim010; 7/23/14 at 01:50 PM.
12/30/12, 03:03 PM
#15
Mach 1 Member
If you want, you can use my VIN - it's a 2012 with every option, including both the camera and backup sensors.
1ZVBP8CF2C5202331
1ZVBP8CF2C5202331
 1/6/13, 10:59 PM
#19
Legacy TMS Member
Thread Starter
The navs are all going to be dual climate zones. But not to worry. The driver's side controls the temp as it did before. Just make sure you get the climate system harness as I outlined above (otherwise the temp controls will be reversed).
Your passenger will just get frustrated because even though the screen says the temp is changing, the vents are still blowing the same temp air as on the drivers.
Your passenger will just get frustrated because even though the screen says the temp is changing, the vents are still blowing the same temp air as on the drivers.
The following users liked this post:
Yunas197 (2/24/24)

