DIY: Brake Rotor & Pad Change (Brembo-equipped 5.0)
 10/16/11, 07:54 PM
#1
Cobra Member
Thread Starter
DIY: Brake Rotor & Pad Change (Brembo-equipped 5.0)
This is a DIY for changing the rotors and pads on a Brembo-optioned GT. This should also apply to the GT500s and Boss, and the rear brakes will be the same on the base GTs and V6s.
I installed Stillen Slotted rotors and Hawk HPS pads on my car. For a detailed review on this combo, check out my review here: https://themustangsource.com/f800/br...review-501150/
On with the installation:
To make your life a little easier, here are the tools you'll need to handle the brakes:
13mm socket
15mm socket
Some sort of punch (to push out the retaining pins on the front calipers... a small screw driver will work)
Rubber mallet
Needle nose pliers
Metal coat hanger or a very short bungee cord
Anti-seize (optional, but recommended)
Brake-quiet (optional, but recommended)
Let's start with the rear of the car. Once you've safely jacked the rear end of the car up and secured it with jack stands, remove the rear wheels:
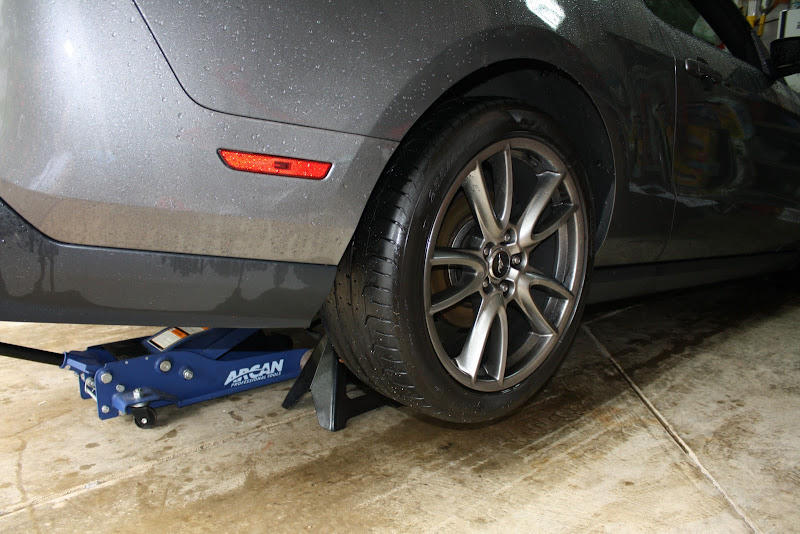
You'll notice it was raining when I did my install... Choose a dry and sunny day to do this if you can!
Wheel removed:

The rear calipers are a very crude but tried and true single-piston design. It will come apart in two parts. First we have to remove the piston assembly using our 13mm socket. Remove both of the 13mm bolts that secure the piston assembly to the bottom half of the caliper. Important: Have your metal coat hanger or short bungee cord ready to hang the caliper -- you don't want to put stress on the brake line.

Once you've removed the piston assembly (it pulls right off), find a spot to hang it as to remove any stress from the brake line. I chose the bracket that secures the brake line to the car.

Make sure you take note of how the pads rest in the lower caliper mount so you place the new ones correctly.
If you are just replacing your pads, you can pop the old pads out and install the new ones, then reinstall the piston assembly. Since we are changing the rotors, we need to remove the lower assembly using a 15mm socket. Remove the two bolts that secure the assembly to the hub, then set it aside.

Take note of this retaining clip before you attempt to remove the rotor:

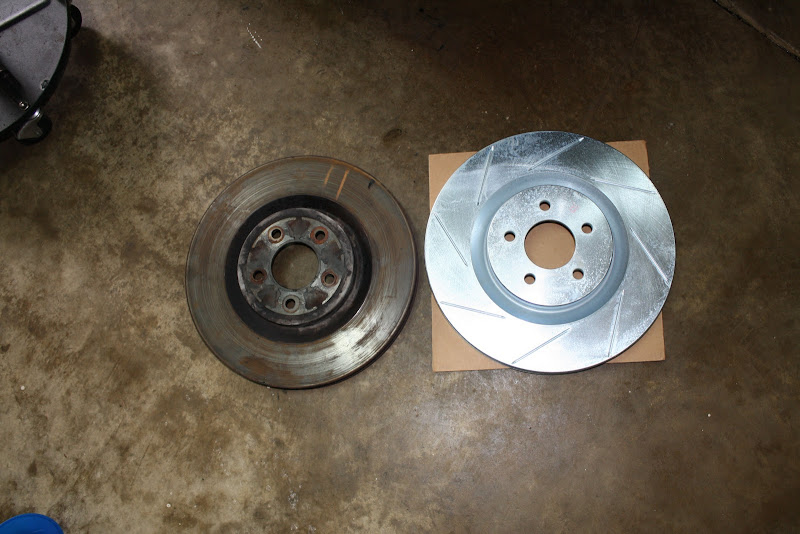
I believe Ford uses these clips to keep the rotors in place while the car is on the assembly line. To remove them, I used needle nose pliers to carefully bend the teeth out and then rotated them off of the stud. Once removed, you can pull the rotor off with ease.
Once you've got the rotor off, I recommend applying a liberal coating of anti-seize to the hub, just to make your life easier for a future rotor change:
I installed Stillen Slotted rotors and Hawk HPS pads on my car. For a detailed review on this combo, check out my review here: https://themustangsource.com/f800/br...review-501150/
On with the installation:
To make your life a little easier, here are the tools you'll need to handle the brakes:
13mm socket
15mm socket
Some sort of punch (to push out the retaining pins on the front calipers... a small screw driver will work)
Rubber mallet
Needle nose pliers
Metal coat hanger or a very short bungee cord
Anti-seize (optional, but recommended)
Brake-quiet (optional, but recommended)
Let's start with the rear of the car. Once you've safely jacked the rear end of the car up and secured it with jack stands, remove the rear wheels:
You'll notice it was raining when I did my install... Choose a dry and sunny day to do this if you can!
Wheel removed:
The rear calipers are a very crude but tried and true single-piston design. It will come apart in two parts. First we have to remove the piston assembly using our 13mm socket. Remove both of the 13mm bolts that secure the piston assembly to the bottom half of the caliper. Important: Have your metal coat hanger or short bungee cord ready to hang the caliper -- you don't want to put stress on the brake line.
Once you've removed the piston assembly (it pulls right off), find a spot to hang it as to remove any stress from the brake line. I chose the bracket that secures the brake line to the car.
Make sure you take note of how the pads rest in the lower caliper mount so you place the new ones correctly.
If you are just replacing your pads, you can pop the old pads out and install the new ones, then reinstall the piston assembly. Since we are changing the rotors, we need to remove the lower assembly using a 15mm socket. Remove the two bolts that secure the assembly to the hub, then set it aside.
Take note of this retaining clip before you attempt to remove the rotor:
I believe Ford uses these clips to keep the rotors in place while the car is on the assembly line. To remove them, I used needle nose pliers to carefully bend the teeth out and then rotated them off of the stud. Once removed, you can pull the rotor off with ease.
Once you've got the rotor off, I recommend applying a liberal coating of anti-seize to the hub, just to make your life easier for a future rotor change:
 10/16/11, 07:54 PM
#2
Cobra Member
Thread Starter
On with the new and off with the old!

Install the rotor onto the hub and reinstall the lower caliper assembly. You don't need to reuse the retaining clip, just toss it.

Now you can put the new pads in place. Here's a comparison of the old ( ) and the new HPS pad:
I should have known better and replaced the rears sooner, but I guess with a little wishful thinking I thought they would last me a little more than 21k.
With the pads in place, you'll notice that the piston assembly will not fit over the new pads. This is where the caliper tool comes in. This type of piston needs to be rotated as it's compressed to avoid damage, so you need one of these tools. I ordered mine off of Amazon, but you can find them at Harbor Freight and maybe at your local auto parts store:
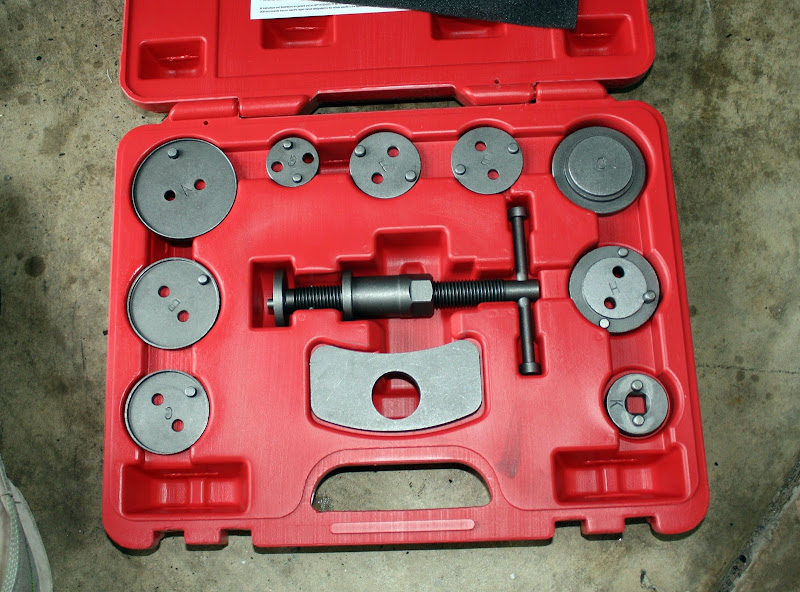
Read the instructions that come with your caliper tool if you've never used one before, and then orient it in the caliper like this, making sure the key you use matches up with the slots in the piston:

Now, this is quite the pain in the rear end. It takes a lot of force to get that piston rotated back into place. I used a 22mm wrench to hold the tool in place, and supported the caliper with the remaining fingers on my left hand that I had free.
Once you figure it out, it's not that bad. Just take your time and think through how the tool works, and keep in mind that you need to rotate the piston in a clockwise direction. Make sure the slots on the piston are oriented exactly like this when it's compressed:

Those slots will fit fight over the back of a protrusion on the backing plate of the pad. If you don't have them oriented like this you won't be able to slide the caliper over the new pads.
Once everything is compressed you can put your new pads in place on the lower assembly. I recommend using Brake Quiet on all of the contact surfaces (contact with the caliper, not the rotor) of the backing plate of your pads. This will help prevent brake squeal.
Reinstall the piston assembly:

With the caliper reinstalled you are good to reinstall the wheel and get to work on the other side.
Install the rotor onto the hub and reinstall the lower caliper assembly. You don't need to reuse the retaining clip, just toss it.
Now you can put the new pads in place. Here's a comparison of the old (
) and the new HPS pad:I should have known better and replaced the rears sooner, but I guess with a little wishful thinking I thought they would last me a little more than 21k.
With the pads in place, you'll notice that the piston assembly will not fit over the new pads. This is where the caliper tool comes in. This type of piston needs to be rotated as it's compressed to avoid damage, so you need one of these tools. I ordered mine off of Amazon, but you can find them at Harbor Freight and maybe at your local auto parts store:
Read the instructions that come with your caliper tool if you've never used one before, and then orient it in the caliper like this, making sure the key you use matches up with the slots in the piston:
Now, this is quite the pain in the rear end. It takes a lot of force to get that piston rotated back into place. I used a 22mm wrench to hold the tool in place, and supported the caliper with the remaining fingers on my left hand that I had free.
Once you figure it out, it's not that bad. Just take your time and think through how the tool works, and keep in mind that you need to rotate the piston in a clockwise direction. Make sure the slots on the piston are oriented exactly like this when it's compressed:
Those slots will fit fight over the back of a protrusion on the backing plate of the pad. If you don't have them oriented like this you won't be able to slide the caliper over the new pads.
Once everything is compressed you can put your new pads in place on the lower assembly. I recommend using Brake Quiet on all of the contact surfaces (contact with the caliper, not the rotor) of the backing plate of your pads. This will help prevent brake squeal.
Reinstall the piston assembly:
With the caliper reinstalled you are good to reinstall the wheel and get to work on the other side.
10/16/11, 07:55 PM
#3
Cobra Member
Thread Starter
Now it's time to do the front brakes. I find these a lot easier and faster to do than the rears.
Once you have jacked the front of the car up and secured it safely with jack stands, remove the front wheels and observe the caliper.
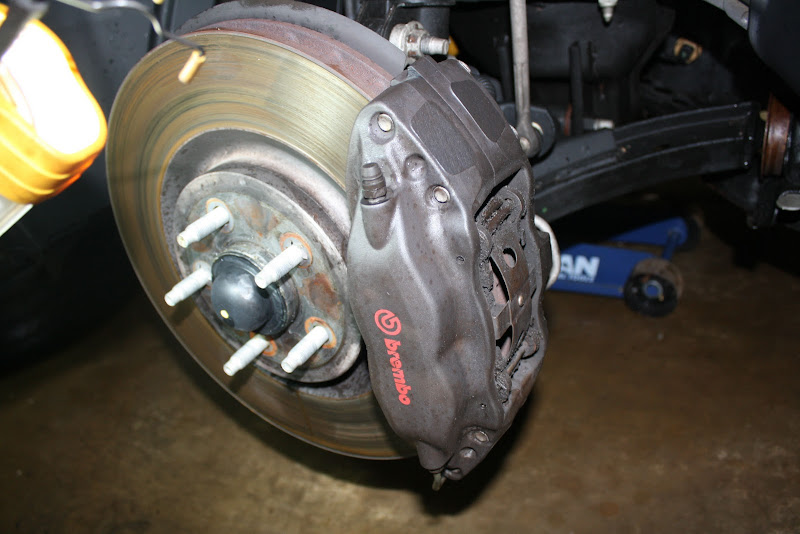
Mine is quite dirty here. Brake dust and road grime will collect, so it can be quite nasty. If you added a lot of brake quiet like I did about 10,000 miles ago, it even more crap will collect. If you want, you can use some brake cleaner to clean off the pieces you are about to remove, after you remove them.
First, we need to use our punch (or small screw driver) to tap out the two retaining pins that hold the pads in place:
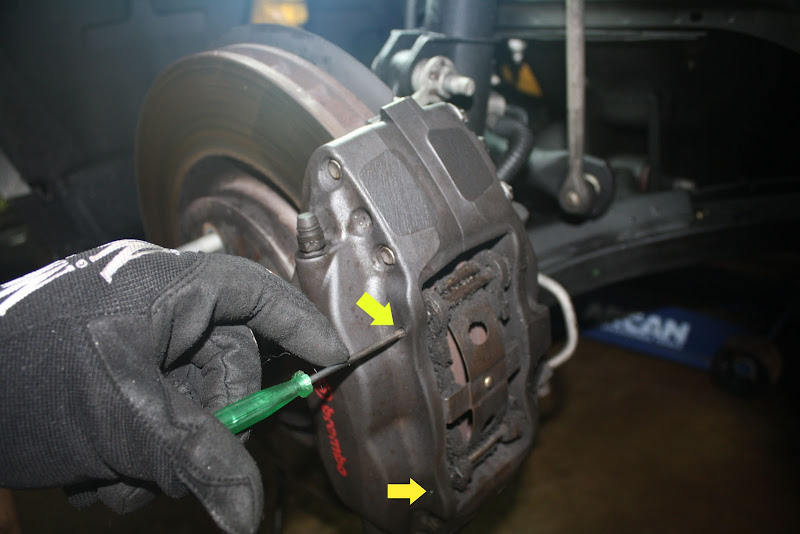
Use your rubber mallet to help you tap these pins out. Go slowly. Also, realize that the retaining clip (that is also secured by the pins) is under quite a bit of pressure and is going to pop off once you remove the first pin, so take care during this step.
Once you've tapped the first pin out you can remove the retaining clip and tap out the second pin.

Set the pins and retaining clip aside... don't lose them!
With the pins removed, carefully pull the pads out of the caliper. You might need to use a screw driver or your pliers to help pry them out. After the pads have been removed, we need to take the caliper off using our 15mm socket. Locate the two bolts that connect the caliper to the back of the hub/spindle.
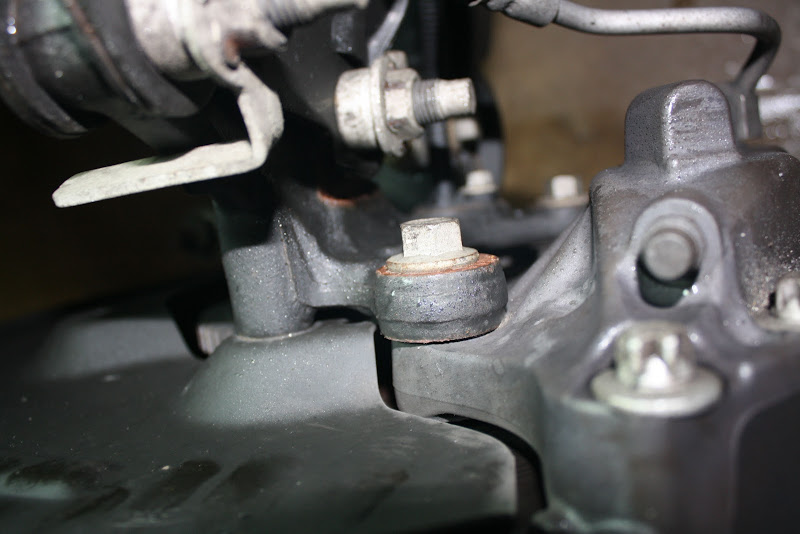
Make sure you have your hanger or bungee ready to hang the caliper from one of the spring coils once you have unbolted it. Be sure to support the caliper when you remove the second bolt to avoid letting it fall and damaging the brake line.

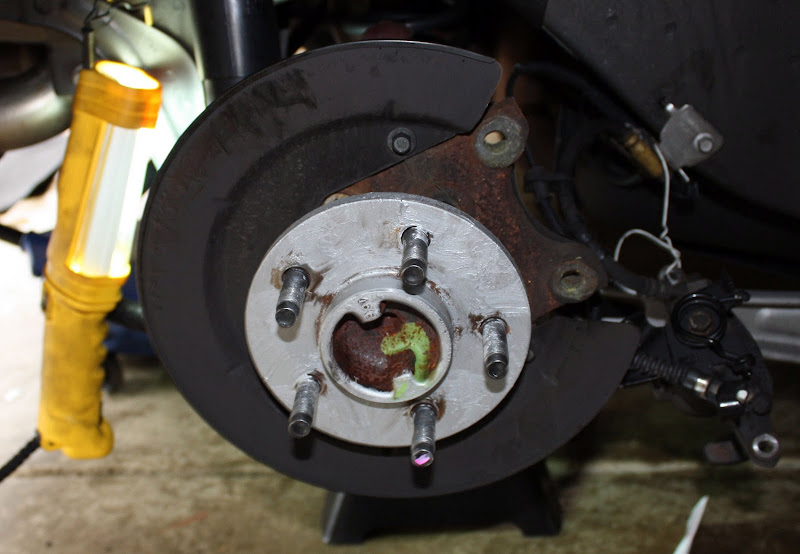
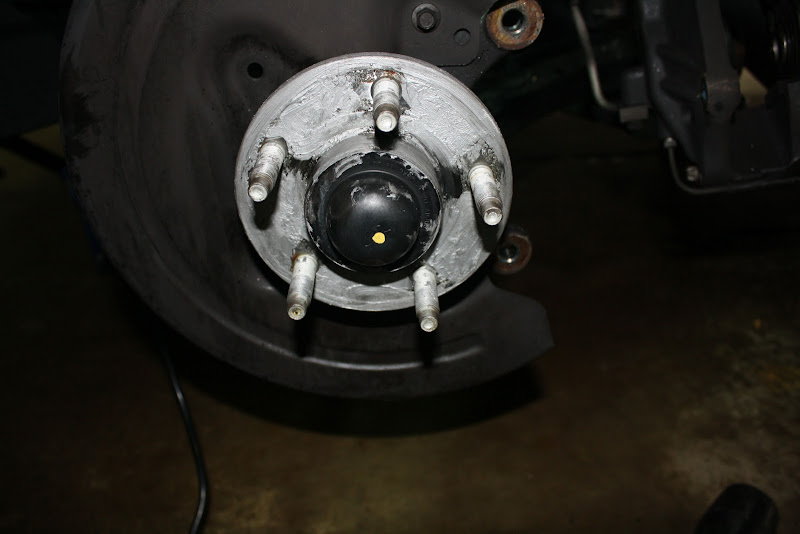
With the caliper removed and out of the way, we can get ready to remove the rotor. Ford used two retaining clips on the front rotor. Remove them just like you did on the rear.

With the rotor removed, I again recommend applying some anti-seize to the hub. Ford does this at the factory and boy is it helpful... the rotors just slide right off. I've worked on cars with seized rotors before where I had to get under the car and kick the rotor off!
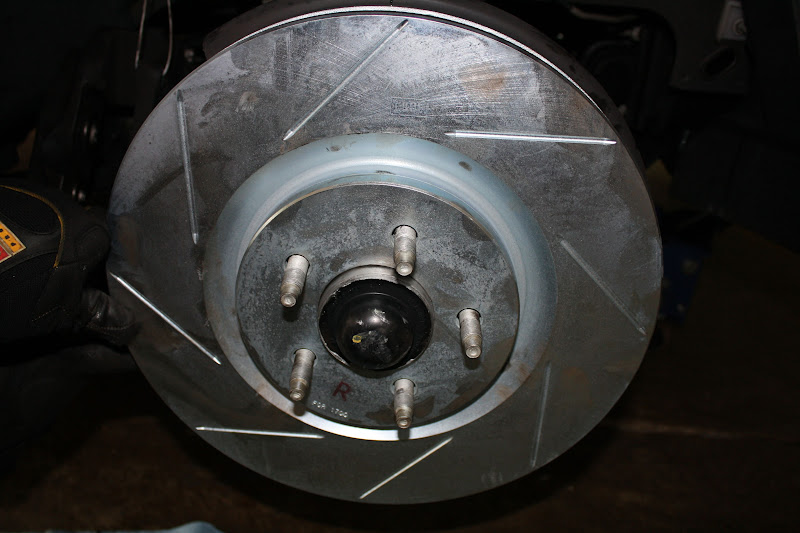
Now we can install the new rotor to the hub:
At this point, reinstall the caliper. With the caliper back on, you'll need to compress the pistons. There are a number of specialty tools available for spreading the pistons on this style caliper, but I have found that you can do it by hand using the old pads and a little elbow grease. I put both of the old pads back into the caliper and use them to pry the pistons back in at the same time. Be sure to do them at the same time so you don't force one out as you force another in.
Once you have the pistons compressed back into the caliper, go ahead and apply your brake quiet to the backing plates of your new pads and reinstall the pads, clip, and pins.
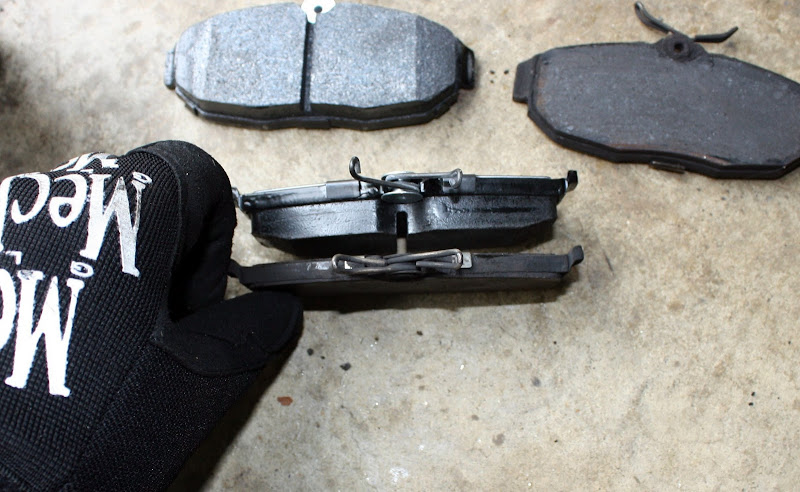
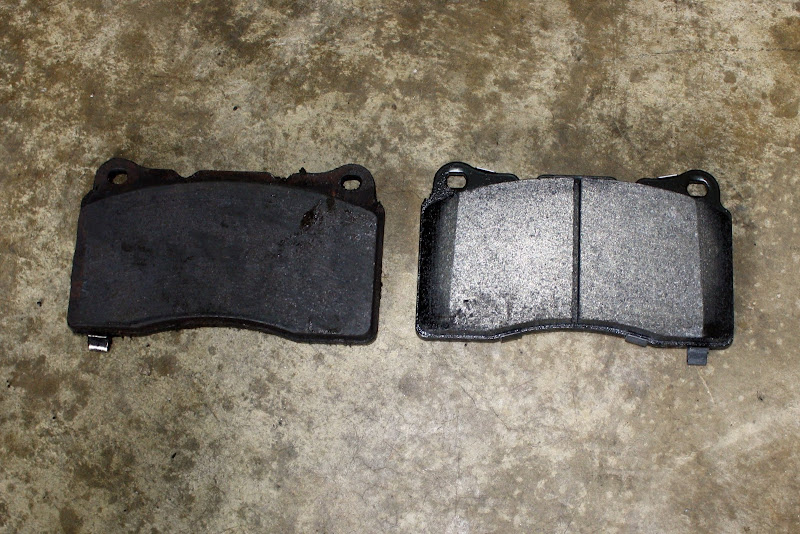
Here are some comparison pictures of the old Ferodo pads and the new HPS:

Once you've got everything tightened back up, it's time to bed in the pads. The bed-in process involves building up heat in the rotors and pads through a series of hard stops that allows a transfer film from the pads to build up onto the rotors. You'll notice when you first attempt to stop with your new pads that the braking force seems very weak. This will change once the pads have been properly bedded.
Hawk calls for a series of 6-10 stops from 35 mph with moderate pressure, followed by harder braking from about 45-50 mph to around 5 mph, without actually coming to a complete stop, about 2-3 times. After you've completed the bed-in process, park the car on a flat surface without engaging the parking brake (to prevent warping the rotors) and allow the brakes to cool completely. Be sure to find a safe place to perform the bed-in procedure, and only attempt it under dry conditions.
Following proper bed-in procedure you'll be able to enjoy the full braking power of your new pads and rotors.
I hope you guys found this helpful.
Once you have jacked the front of the car up and secured it safely with jack stands, remove the front wheels and observe the caliper.
Mine is quite dirty here. Brake dust and road grime will collect, so it can be quite nasty. If you added a lot of brake quiet like I did about 10,000 miles ago, it even more crap will collect. If you want, you can use some brake cleaner to clean off the pieces you are about to remove, after you remove them.
First, we need to use our punch (or small screw driver) to tap out the two retaining pins that hold the pads in place:
Use your rubber mallet to help you tap these pins out. Go slowly. Also, realize that the retaining clip (that is also secured by the pins) is under quite a bit of pressure and is going to pop off once you remove the first pin, so take care during this step.
Once you've tapped the first pin out you can remove the retaining clip and tap out the second pin.
Set the pins and retaining clip aside... don't lose them!
With the pins removed, carefully pull the pads out of the caliper. You might need to use a screw driver or your pliers to help pry them out. After the pads have been removed, we need to take the caliper off using our 15mm socket. Locate the two bolts that connect the caliper to the back of the hub/spindle.
Make sure you have your hanger or bungee ready to hang the caliper from one of the spring coils once you have unbolted it. Be sure to support the caliper when you remove the second bolt to avoid letting it fall and damaging the brake line.
With the caliper removed and out of the way, we can get ready to remove the rotor. Ford used two retaining clips on the front rotor. Remove them just like you did on the rear.
With the rotor removed, I again recommend applying some anti-seize to the hub. Ford does this at the factory and boy is it helpful... the rotors just slide right off. I've worked on cars with seized rotors before where I had to get under the car and kick the rotor off!
Now we can install the new rotor to the hub:
At this point, reinstall the caliper. With the caliper back on, you'll need to compress the pistons. There are a number of specialty tools available for spreading the pistons on this style caliper, but I have found that you can do it by hand using the old pads and a little elbow grease. I put both of the old pads back into the caliper and use them to pry the pistons back in at the same time. Be sure to do them at the same time so you don't force one out as you force another in.
Once you have the pistons compressed back into the caliper, go ahead and apply your brake quiet to the backing plates of your new pads and reinstall the pads, clip, and pins.
Here are some comparison pictures of the old Ferodo pads and the new HPS:
Once you've got everything tightened back up, it's time to bed in the pads. The bed-in process involves building up heat in the rotors and pads through a series of hard stops that allows a transfer film from the pads to build up onto the rotors. You'll notice when you first attempt to stop with your new pads that the braking force seems very weak. This will change once the pads have been properly bedded.
Hawk calls for a series of 6-10 stops from 35 mph with moderate pressure, followed by harder braking from about 45-50 mph to around 5 mph, without actually coming to a complete stop, about 2-3 times. After you've completed the bed-in process, park the car on a flat surface without engaging the parking brake (to prevent warping the rotors) and allow the brakes to cool completely. Be sure to find a safe place to perform the bed-in procedure, and only attempt it under dry conditions.
Following proper bed-in procedure you'll be able to enjoy the full braking power of your new pads and rotors.
I hope you guys found this helpful.
Last edited by m4a1mustang; 10/16/11 at 08:00 PM.
 10/17/11, 03:07 PM
#8
Bullitt Member
Join Date: February 1, 2011
Location: Mount Pleasant, SC
Posts: 208
Likes: 0
Received 1 Like
on
1 Post
Great write-up!
Glad you included the bedding process, as most people don't do that correctly, or at all. I'd also recommend seasoning the rotors, as per Baer Brake's website...
JR
Glad you included the bedding process, as most people don't do that correctly, or at all. I'd also recommend seasoning the rotors, as per Baer Brake's website...
JR
10/17/11, 05:58 PM
#9
V6 Member

Join Date: October 24, 2010
Location: Vancouver, BC
Posts: 50
Likes: 0
Received 0 Likes
on
0 Posts
I've done more of these caliper changes than I can count, and while the bailing wire hanger works ok at the front, it's a pain to hook up and a pain to undo. That, and the caliper really wants to swing back into the place it came from. And if you're changing the front struts, well, you've got nowhere to hang it anyway. I found a better solution that works great on the Mustang.
Slide a broom handle down through the wheel well over the front subframe and under the chassis so that it protrudes into the wheel well about a foot. When you unbolt the caliper you just slide that big hole where the pads came out over the end of the broom handle and let it hang there. It's safely out of the way and you can do anything you want to the front suspension because the caliper's not hanging off of it.
There isn't such an easy solution for the rear, although the rear caliper doesn't weigh very much and the handbrake cable takes most of the load if you just let it hang.
Last edited by JAJ; 10/17/11 at 06:01 PM.
10/17/11, 07:00 PM
#10
Cobra Member
Thread Starter
I've done more of these caliper changes than I can count, and while the bailing wire hanger works ok at the front, it's a pain to hook up and a pain to undo. That, and the caliper really wants to swing back into the place it came from. And if you're changing the front struts, well, you've got nowhere to hang it anyway. I found a better solution that works great on the Mustang.
Slide a broom handle down through the wheel well over the front subframe and under the chassis so that it protrudes into the wheel well about a foot. When you unbolt the caliper you just slide that big hole where the pads came out over the end of the broom handle and let it hang there. It's safely out of the way and you can do anything you want to the front suspension because the caliper's not hanging off of it.
There isn't such an easy solution for the rear, although the rear caliper doesn't weigh very much and the handbrake cable takes most of the load if you just let it hang.
Slide a broom handle down through the wheel well over the front subframe and under the chassis so that it protrudes into the wheel well about a foot. When you unbolt the caliper you just slide that big hole where the pads came out over the end of the broom handle and let it hang there. It's safely out of the way and you can do anything you want to the front suspension because the caliper's not hanging off of it.
There isn't such an easy solution for the rear, although the rear caliper doesn't weigh very much and the handbrake cable takes most of the load if you just let it hang.
But that broom idea sounds interesting especially if you are doing suspension work like you said.
10/22/11, 03:21 AM
#12
Originally Posted by 2012GTCS
Little off topic but is there a way to put bigger rotors on the rear of our cars?! They kinda look silly, especially on the brembo cars...
https://purespeedmotorsports.com/pro...12-Mustangs%29
10/28/11, 06:01 AM
#13
 11/8/11, 06:01 PM
#14
Bullitt Member

This is a DIY for changing the rotors and pads on a Brembo-optioned GT. This should also apply to the GT500s and Boss, and the rear brakes will be the same on the base GTs and V6s.
I installed Stillen Slotted rotors and Hawk HPS pads on my car. For a detailed review on this combo, check out my review here: https://themustangsource.com/f800/br...review-501150/
On with the installation:
To make your life a little easier, here are the tools you'll need to handle the brakes:
13mm socket
15mm socket
Some sort of punch (to push out the retaining pins on the front calipers... a small screw driver will work)
Rubber mallet
Needle nose pliers
Metal coat hanger or a very short bungee cord
Anti-seize (optional, but recommended)
Brake-quiet (optional, but recommended)
Let's start with the rear of the car. Once you've safely jacked the rear end of the car up and secured it with jack stands, remove the rear wheels:
You'll notice it was raining when I did my install... Choose a dry and sunny day to do this if you can!
Wheel removed:
The rear calipers are a very crude but tried and true single-piston design. It will come apart in two parts. First we have to remove the piston assembly using our 13mm socket. Remove both of the 13mm bolts that secure the piston assembly to the bottom half of the caliper. Important: Have your metal coat hanger or short bungee cord ready to hang the caliper -- you don't want to put stress on the brake line.
Once you've removed the piston assembly (it pulls right off), find a spot to hang it as to remove any stress from the brake line. I chose the bracket that secures the brake line to the car.
Make sure you take note of how the pads rest in the lower caliper mount so you place the new ones correctly.
If you are just replacing your pads, you can pop the old pads out and install the new ones, then reinstall the piston assembly. Since we are changing the rotors, we need to remove the lower assembly using a 15mm socket. Remove the two bolts that secure the assembly to the hub, then set it aside.
Take note of this retaining clip before you attempt to remove the rotor:
I believe Ford uses these clips to keep the rotors in place while the car is on the assembly line. To remove them, I used needle nose pliers to carefully bend the teeth out and then rotated them off of the stud. Once removed, you can pull the rotor off with ease.
Once you've got the rotor off, I recommend applying a liberal coating of anti-seize to the hub, just to make your life easier for a future rotor change:
11/9/11, 09:57 PM
#15
Legacy TMS Member
Man I'm gonna have to get that rear caliper tool kit, beats the hell out of that cheap **** block you get from the help isle.
I would like to point out one thing though. When compressing the calipers its best to open the bleeders and allow the fluid to drain out. Compressing the calipers and forcing the fluid back up the line can clog the brake controller (abs, tcs, scs) subsequently causing the unit to fail.
I dont think it happens often, but often enough I've read about it as a tech tip in a brake industry magazine not as some sort of sales gimmick to make money but in order to avoid having to replace the controller at the shop's expense.
Since most brake fluid is hygroscopic and if the fluid is a coupla years old, I'd reccomend flushing the system while your bleeding the brakes so that peak performance is maintained with the new brake components. The reason being as water infiltrates the fluid, its boiling point is lowered which could obviously lead to brake failure.
Last edited by bob; 11/9/11 at 09:59 PM.
11/10/11, 04:01 PM
#17
Cobra Member
Thread Starter
Man I'm gonna have to get that rear caliper tool kit, beats the hell out of that cheap **** block you get from the help isle.
I would like to point out one thing though. When compressing the calipers its best to open the bleeders and allow the fluid to drain out. Compressing the calipers and forcing the fluid back up the line can clog the brake controller (abs, tcs, scs) subsequently causing the unit to fail.
I dont think it happens often, but often enough I've read about it as a tech tip in a brake industry magazine not as some sort of sales gimmick to make money but in order to avoid having to replace the controller at the shop's expense.
Since most brake fluid is hygroscopic and if the fluid is a coupla years old, I'd reccomend flushing the system while your bleeding the brakes so that peak performance is maintained with the new brake components. The reason being as water infiltrates the fluid, its boiling point is lowered which could obviously lead to brake failure.
I would like to point out one thing though. When compressing the calipers its best to open the bleeders and allow the fluid to drain out. Compressing the calipers and forcing the fluid back up the line can clog the brake controller (abs, tcs, scs) subsequently causing the unit to fail.
I dont think it happens often, but often enough I've read about it as a tech tip in a brake industry magazine not as some sort of sales gimmick to make money but in order to avoid having to replace the controller at the shop's expense.
Since most brake fluid is hygroscopic and if the fluid is a coupla years old, I'd reccomend flushing the system while your bleeding the brakes so that peak performance is maintained with the new brake components. The reason being as water infiltrates the fluid, its boiling point is lowered which could obviously lead to brake failure.