05-09 Exterior Modifications Making Your '05 Stand Out from the Crowd

Plasti Dip How To

Thread Tools
 
Search this Thread
 
Old 6/1/12, 11:51 PM
  #21  
Mach 1 Member
 
Zaksgt's Avatar
 
Join Date: November 20, 2011
Posts: 677
Likes: 0
Received 1 Like on 1 Post
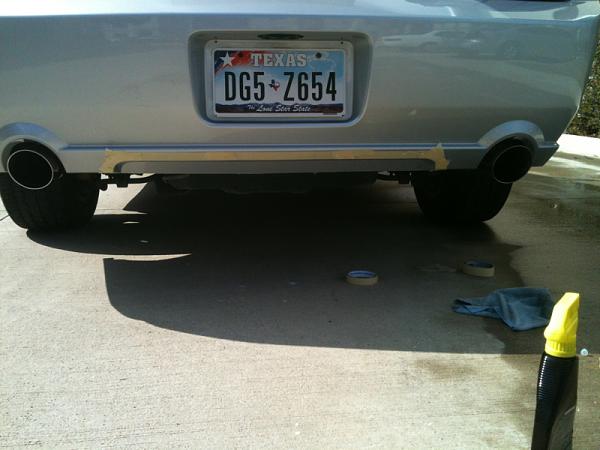
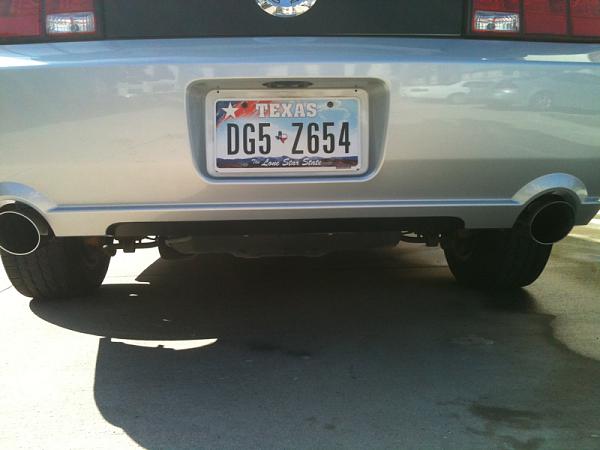
The rear deck lid is magnetic not plasti dip, I also did the rear bumper piece let me know what u think


Plasti Dip How To-image-1029261482.jpg


Plasti Dip How To-image-344819981.jpg
Old 6/2/12, 10:20 AM
  #22  
Mach 1 Member
Thread Starter
 
Kevin509's Avatar
 
Join Date: October 30, 2011
Location: Spokane, WA
Posts: 858
Likes: 0
Received 0 Likes on 0 Posts
Originally Posted by Zaksgt
The rear deck lid is magnetic not plasti dip, I also did the rear bumper piece let me know what u think
Oh, gotcha. Is that the magnetic one American Muscle sells?

Also, that looks really good! It's all the little details that really bring a car together for me and stuff like that really make it stand out from the typical 'silver & black' color schemes you see where people just put black wheels on their car or whatever.
Old 6/2/12, 10:29 AM
  #23  
GTR Member
 
SilverSkoundrel's Avatar
 
Join Date: November 6, 2011
Location: Texas
Posts: 6,764
Received 19 Likes on 19 Posts
I absolutely love the silver & black they just flow like Chinese food and chocolate pudding
Old 6/2/12, 12:14 PM
  #24  
Mach 1 Member
 
Zaksgt's Avatar
 
Join Date: November 20, 2011
Posts: 677
Likes: 0
Received 1 Like on 1 Post
Originally Posted by Kevin509

Oh, gotcha. Is that the magnetic one American Muscle sells?

Also, that looks really good! It's all the little details that really bring a car together for me and stuff like that really make it stand out from the typical 'silver & black' color schemes you see where people just put black wheels on their car or whatever.
Yup it's from American Muscle
Old 6/2/12, 08:19 PM
  #25  
Mach 1 Member
Thread Starter
 
Kevin509's Avatar
 
Join Date: October 30, 2011
Location: Spokane, WA
Posts: 858
Likes: 0
Received 0 Likes on 0 Posts
Did my medallion tonight, so I think I've got all the chrome done now.

Rather than mask off right around the edges I used the same technique as I did with the GT badges, masking a box around the medallion. Came out perfect.
Attached Thumbnails Plasti Dip How To-image-3298157390.jpg   Plasti Dip How To-image-3816837466.jpg   Plasti Dip How To-image-3633057925.jpg  
Old 6/2/12, 09:24 PM
  #26  
GTR Member
 
SilverSkoundrel's Avatar
 
Join Date: November 6, 2011
Location: Texas
Posts: 6,764
Received 19 Likes on 19 Posts
Originally Posted by Kevin509
Did my medallion tonight, so I think I've got all the chrome done now.

Rather than mask off right around the edges I used the same technique as I did with the GT badges, masking a box around the medallion. Came out perfect.
Looks like it turned out pretty good
Old 6/3/12, 07:52 PM
  #27  
Mach 1 Member
 
Zaksgt's Avatar
 
Join Date: November 20, 2011
Posts: 677
Likes: 0
Received 1 Like on 1 Post
Looks sharp!! Ur car looks great!!
Old 6/4/12, 08:21 PM
  #28  
Shelby GT500 Member
 
06blackvertstang's Avatar
 
Join Date: January 9, 2012
Location: Oklahoma
Posts: 2,687
Likes: 0
Received 0 Likes on 0 Posts
Really nice thread man. Probably deserves a sticky
Old 6/5/12, 07:59 PM
  #29  
Mach 1 Member
Thread Starter
 
Kevin509's Avatar
 
Join Date: October 30, 2011
Location: Spokane, WA
Posts: 858
Likes: 0
Received 0 Likes on 0 Posts
Originally Posted by 06blackvertstang
Really nice thread man. Probably deserves a sticky
Thanks! I just like to help out!
Old 6/5/12, 09:08 PM
  #30  
Cobra Member
 
Iceknyght's Avatar
 
Join Date: September 6, 2005
Location: Colorado
Posts: 1,296
Likes: 0
Received 2 Likes on 2 Posts
Originally Posted by Zaksgt
The rear deck lid is magnetic not plasti dip, I also did the rear bumper piece let me know what u think


Attachment 111375


Attachment 111376
This is what I have been wanting to do with mine! Looks great!

Any tips? Did you tape, spray, then peel back the tape on each round of spraying?
Old 6/5/12, 10:24 PM
  #31  
Mach 1 Member
Thread Starter
 
Kevin509's Avatar
 
Join Date: October 30, 2011
Location: Spokane, WA
Posts: 858
Likes: 0
Received 0 Likes on 0 Posts
Originally Posted by Iceknyght
This is what I have been wanting to do with mine! Looks great!

Any tips? Did you tape, spray, then peel back the tape on each round of spraying?
Take a look at post #25, and my emblem how to at post #3, I used the same technique on the emblems as I did on my medallion and it worked perfect. Using that technique you don't need to tape/peel/retape with each coat.
Old 6/5/12, 10:31 PM
  #32  
Cobra Member
 
Iceknyght's Avatar
 
Join Date: September 6, 2005
Location: Colorado
Posts: 1,296
Likes: 0
Received 2 Likes on 2 Posts
I was actually talking about the bottom section between the exhaust... Apparently the pictures from the post I quoted didn't come through...
Old 6/6/12, 12:27 AM
  #33  
Mach 1 Member
 
Zaksgt's Avatar
 
Join Date: November 20, 2011
Posts: 677
Likes: 0
Received 1 Like on 1 Post
I just taped it of and sprayed a few coats, then I got a razor blade and cut the tape were it meets the plasti dip to get a straight line, just be careful and don't cut ur paint. But I used to paint for a living so I'm pretty particular on how it looks, I hate if it nit perfectly straight lol
Old 6/6/12, 10:03 AM
  #34  
Cobra Member
 
Iceknyght's Avatar
 
Join Date: September 6, 2005
Location: Colorado
Posts: 1,296
Likes: 0
Received 2 Likes on 2 Posts
Originally Posted by Zaksgt
I just taped it of and sprayed a few coats, then I got a razor blade and cut the tape were it meets the plasti dip to get a straight line, just be careful and don't cut ur paint. But I used to paint for a living so I'm pretty particular on how it looks, I hate if it nit perfectly straight lol
I am not a painter, but am definitely OCD when it comes to straight lines! There were a few places in our house that we needed to paint straight lines (on textured walls) and the prep work I did to make sure it came out perfect was pretty extensive, so I understand where you're coming from!

Thanks for the tip!
Old 6/6/12, 08:25 PM
  #35  
Mach 1 Member
Thread Starter
 
Kevin509's Avatar
 
Join Date: October 30, 2011
Location: Spokane, WA
Posts: 858
Likes: 0
Received 0 Likes on 0 Posts
Originally Posted by Iceknyght
I was actually talking about the bottom section between the exhaust... Apparently the pictures from the post I quoted didn't come through...
Oh, my mistake then! If it were me, I'd peel the tape back a little between coats doing that part,just because the thought of taking a razor to my paint makes me nervous.
Old 6/7/12, 03:06 PM
  #36  
GTR Member
 
SilverSkoundrel's Avatar
 
Join Date: November 6, 2011
Location: Texas
Posts: 6,764
Received 19 Likes on 19 Posts
It looks like the plasti dip im using is bubbling after I spray it
Old 6/7/12, 04:07 PM
  #37  
GTR Member
 
SilverSkoundrel's Avatar
 
Join Date: November 6, 2011
Location: Texas
Posts: 6,764
Received 19 Likes on 19 Posts
Quick question. The plasti dip is drying perfect on one side but there's literally a line to where it's not drying well? Any help is greatly appreciated.
Attached Thumbnails Plasti Dip How To-image-2512856652.jpg  
Old 6/7/12, 07:14 PM
  #38  
Member
 
A Dustman's Avatar
 
Join Date: January 13, 2012
Location: Calgary, Alberta
Posts: 49
Received 1 Like on 1 Post
Did you clean that area well with alcohol?
Old 6/7/12, 07:26 PM
  #39  
GTR Member
 
SilverSkoundrel's Avatar
 
Join Date: November 6, 2011
Location: Texas
Posts: 6,764
Received 19 Likes on 19 Posts
Originally Posted by A Dustman
Did you clean that area well with alcohol?
I did not clean any of it with alcohol. But only that small spot jacked up
Old 6/7/12, 08:52 PM
  #40  
GTR Member
 
SilverSkoundrel's Avatar
 
Join Date: November 6, 2011
Location: Texas
Posts: 6,764
Received 19 Likes on 19 Posts
Passenger side dried great. Driver side not so well, I peeled it off cleaned & resprayed now im waiting on it to dry to make sure it's not jacked up again.


Quick Reply: Plasti Dip How To


All times are GMT -6. The time now is 02:23 AM.